 Project COBRA'33
Project COBRA'33
Frame Build-Up Part IV
08-11-07
Welcome to Frame Build Part IV of Project Cobra'33. Then we left off in Part III, the frame was just about as far as we could go, and the body was the next issue to tackle. We had the body sand blasted and I painted the inside with Rust Bullet. We had just gotten back from our trip to the Street Rod Nationals in Louisville, Kentucky, where we purchased most of the parts to finish all the body work and most of the interior work as well. That Monday after the Nationals I called Midwest Early Ford and purchased most of the parts that were on my list, but I didn't fine at the Nationals. The following is a list of what was purchased.
Midwest Early Ford
| 12 V Electric Horns, New | 2 | 145.00 | 190.00 | |
| Door Hinge Screw Kit | 4 | 3.00 | 12.00 | |
| Cowl Lacing Kit | 1 | 12.00 | 12.00 | |
| Radiator to Hood Lacing Kit | 1 | 15.00 | 15.00 | |
| Lower Door Seal kit | 1 | 12.00 | 12.00 | |
| Upper Door Seals Kit | 1 | 15.00 | 15.00 | |
| Front, Window Channel Kit, W/SS Bead | 1 | 65.00 | 65.00 | |
| Rear, Window Channel Kit, W/SS Bead | 1 | 65.00 | 65.00 | |
| Grey Hound Radiator Emblem, Chrome | 1 | 90.00 | 90.00 | |
| Radiator bezel, Chrome, 1934 | 1 | 60.00 | 60.00 | |
| Ford Script Logo | 1 | 35.00 | 35.00 | |
| SS Cowl Hood Rod Mounts | 1 | 18.00 | 18.00 | |
| Glass Setting Tape, 1/32" | 1 | 10.00 | 10.00 | |
| Rubber Mounting Tape, 2" x 30' | 1 | 15.00 | 15.00 | |
| 1933 Ford Tudor Sills | 1 | 160.00 | 160.00 | |
| Gas Tank Neck Rubber Grommet | 1 | 6.00 | 6.00 | |
| Windshield Regulator Handle, Chrome | 1 | 12.00 | 12.00 | |
| Chrome Acorn Nut Covers, Chrome,Kit | 1 | 30.00 | 30.00 | |
| New Cylinder Head Nuts, Flathead | 50 | .35 | 17.50 | |
| Shipping | 0.00 | 0.00 | ||
| TOTAL | 959.50 |
Next Came a call to Speedway Motors for some more small items.
Speedway Motors
| 1/4" LED Lights,Amber | 3 | 3.99 | 11.97 | |
| 1/4" LED Lights,Green | 3 | 3.99 | 11.97 | |
| 1/4" LED Lights,Red | 3 | 3.99 | 11.97 | |
| Generator Cover, Flathead, Chrome | 1 | 19.99 | 19.99 | |
| Starter Cover, Flathead, Chrome | 1 | 18.99 | 18.99 | |
| Flathead Exhaust Flanges, Pair | 1 | 34.99 | 34.99 | |
| 1-5/8" Combo Bend Tubing | 2 | 15.99 | 31.98 | |
| Remote Battery Terminals | 1 | 15.99 | 15.99 | |
| Breather Tube, Flathead, Chrome | 1 | 18.99 | 18.99 | |
| AN-8 to 1/4" Straight Fitting | 2 | 4.99 | 9.98 | |
| Flathead Exhaust Gasket Set | 1 | 19.99 | 19.99 | |
| Red Plug Ignition Wires, W90° Ends | 1 | 31.95 | 31.95 | |
| Shipping | 10.95 | 10.95 | ||
| Total | 249.71 |
Next I made an order with S & S Headers, they were the only company that offered 3 into 1 collectors at an affordable price. True, they were only the stamped type collectors and not the wonderful works of art sold for custom headers made for drag racing, but they were just What I needed to build the headers for our Project:Flat-Head.
S & S Headers
1. 1-5/8" J-Bend Tubing 8 @ 12.98 103.84
2. 3 into 1 collectors, 1-5/8" 2 @ 15.98 31.96
Total 135.80
While we were at The Street Rod nationals, we Purchased a 3-in 1 Sheet Metal Machine, and a Bead Roller. Since we are about to start of the body, which includes both outside and inside sheet metal work, I needed to get some more sheet metal in stock. I called American Metal Supply, which I use regularly, and ordered the following.
American Metal Supply
1. 20 Gauge Sheet Meet, Cold Rolled, 4' x 10' Sheets 3 @ 28.98 86.94
2. 18 Gauge Sheet Meet, Cold Rolled, 4' x 10' Sheets 2 @ 38.99 77.98
3. 16 Gauge Sheet Meet, Cold Rolled, 4' x 10' Sheets 2 @ 45.99 91.98
Total 256.69
Knowing we are about to start the sheet metal and other various welding projects, I thought it would get a great time to replenish my abrasive supplies. I like to use 5" abrasive disc in my side 4-1/2" grinder for most sanding jobs. I prefer them over flap disc and even hard grinding type disc. For me they offer more control, and do a better job then anything else I've tried. My dad still prefers the hard grinding disc, but I think when he gets use to the sanding disc he'll see now much better they really are. Don't get me wrong, I still use hard grinding disc on some jobs, were they are clearly the way to go. These are usually jobs that require large amounts of metal to be removed, and for that they work great, just I'll switch before I get down to the finish area, back to a 5" sanding disc, where others would have continued to use the grinding disc. I suppose it's personal preference, I just think they do a better job and make the project look nicer. Anyhow, I looked up On line Industrial Supply and Ordered the following.
On line Industrial Supply
| Blue Zirconia Fiber Grinding Disc | 16 grit | 25 | 24.95 | 24.95 |
| Blue Zirconia Fiber Grinding Disc | 36 grit | 50 | 18.95 | 37.90 |
| Blue Zirconia Fiber Grinding Disc | 60 grit | 25 | 17.95 | 17.95 |
| Blue Zirconia Fiber Grinding Disc | 80 grit | 25 | 16.95 | 16.95 |
| Aluminum Oxide 6" x 48" Sanding Belts | 60 grit | 10 | 37.95 | 37.95 |
| Aluminum Oxide 6" x 48" Sanding Belts | 120 grit | 10 | 37.95 | 37.95 |
| Aluminum Oxide Adhesive Disc, 6" | 60 grit | 50 | 36.95 | 36.95 |
| Aluminum Oxide Adhesive Disc, 6" | 120 grit | 50 | 32.95 | 32.95 |
| Shop Sanding Roll | 80 | 1 | 7.95 | 7.95 |
| shipping | 15.95 | |||
| TOTAL | 267.45 | |||
-
Then I finally found the Hand held belt sander I was looking for. Most are air driven and I wanted one that was electric. This is a Proxxon, it's made in Germany and uses a 3/8" x 13" belt, which is a little hard to find. I bought the belt sander for $159.00, and ordered the belts from AA Abrasives, Inc..
AA Abrasives, Inc.
1. 38" x 13" Zirc Plus 60 Grit Air file Belts, 50 pack 54.96
2. 3/8" x 13" Premium 120 Grit Air file Belts, 50 pack 36.64
Total 91.60
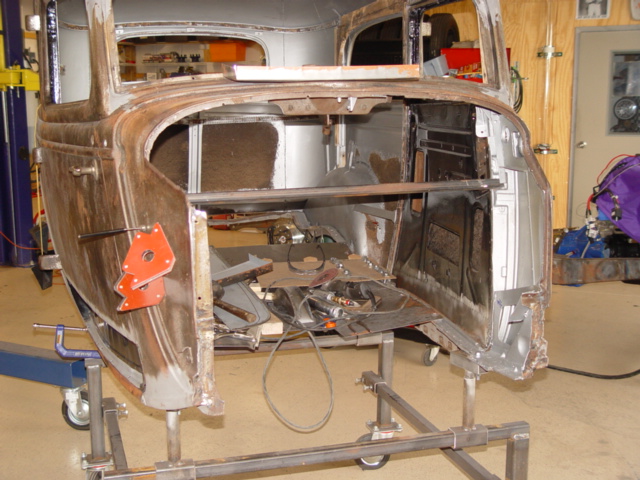
Today we once again got started on the floor, this time we removed the portion that was not needed, basically 98% of it. We only left a 1" slit around the perimeter to help attach the new flooring too. The sub-floor was also removed, as it would not work with the flat flooring we will be installing in Project Cobra'33 . The Factory floor pan was in really good condition, they used some pretty thick metal back in the old days and it held up very well. Unfortunately like I stated earlier, the stock floor would not work with our new Frame.
Once the floor was removed, we positioned the body on the 2-post and used the lift arms to raise the body so we could position the chassis under it. Right away, it was pretty apparent I needed to remove the shifter and the emergency brake handle, it just wouldn't fit under the fire-wall. Oh, yell....we welded two (2) pieces of 3/4" square tube across the body before we cut the floor out. One went in the rear, just before the kick-up and the other in the front a little under the bottom of the dash. These are used to keep the bottom of the body from spreading out and hurting the body. I know the fire-wall has to be cut, but I wanted to take the time needed, so I would only cut out what was needed, and nothing more.
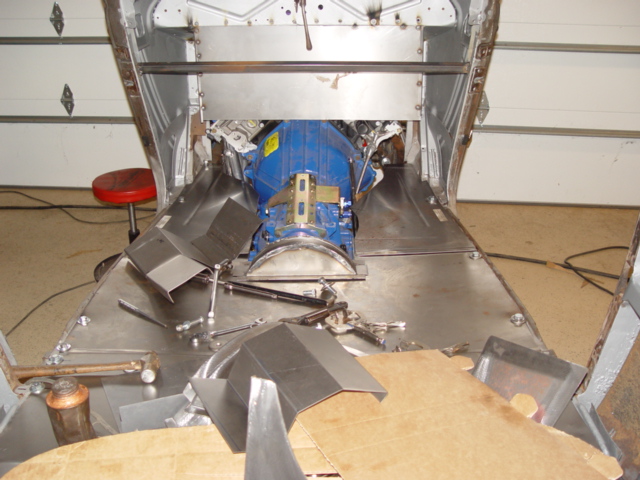
The first positioning....We lowered the body down over the chassis as much as we could. I marked the fire-wall where I thought it would work, and we lifted the body back up and rolled the chassis out from under it. We cut the fire-wall, I knew this would not be the last time we did this, but I wanted to cut as little as possible and keep it look nice. We once again rolled the chassis back under the body and lowered it back down. This time we got a little closer to it fitting, maybe 4" up off the frame rail and 3-4" back from where it needed to be. Another look and it was pretty apparent that the fire-wall would need some serious surgery. I was hoping we could keep the cuts below the angle line, where the fire-wall slant downward, but it wasn't going to happen. The body was 4 inches off the frame, and it wasn't even close to fitting. I scribed some new lines, this time taking them 5 inches above the angle line, so much for that dream!! We now not only had to remove that 5 inch area, but I went ahead and ran the lines all the way across the fire-wall and got rid of the tapper we had to the sides. We also had another problem, the passenger side front body mounting hole was interfering with the headers. I trimmed the body work as close as comfortable without loosing the mounting point, and tried the fit again. We rolled the chassis back under the body and lowered it down once again, this time we got real close to it fitting, we needed just a little more off the fire-wall, about 1/2-3/4" across the top, and the passenger side front body mount would not work with the headers on. So..we raised the body, rolled the chassis out from under it, and trimmed the fire-wall, and removed the passenger side header. These locking header bolts are great for staying tight, rotten for removing. One other small modification was to the rear body area right were we installed the through the frame fittings for the brake system. Both fittings were hitting the body about 3/4" up. I had marked the area before we removed the chassis, and used a hole punch to remove just enough material so it should fit without problem.
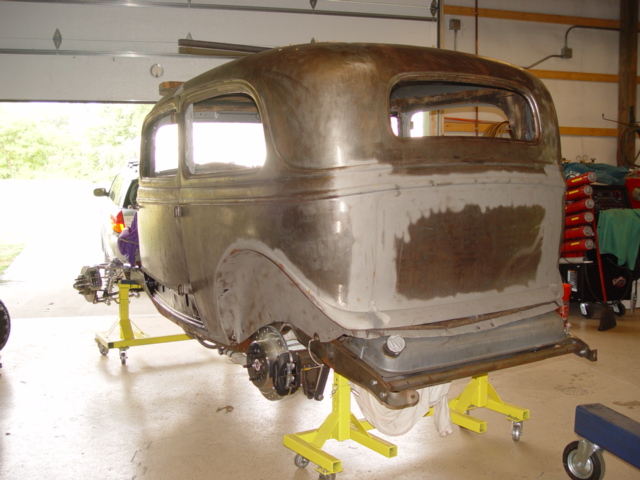
Again we rolled the chassis back under the body, and lowered it down. This time everything fit and the body was able to fully seat of the chassis. This is were we left it, till the next time. I couldn't help but to stare at it, the body looked so good sitting there, I really got a felling of what this thing will look like, and it was exciting. For the first time, the body was sitting on the frame on it's own!!
The fit was great, I was worried about that, after all we had plenty of problems with the frame. My fear was that it wouldn't fit the contour of the frame, where it makes that gentle curve around the passenger compartment. But..it fit like a glove. the body went right down over the frame like it was suppose to, no more and no less, just right. Perfectly.
08-19-07
Today was much cooler and less humidity then in the past, and I headed down to work on the car. I wanted to get the body bolted to the frame today, simple enough I thought, but not that easy as I would find out.
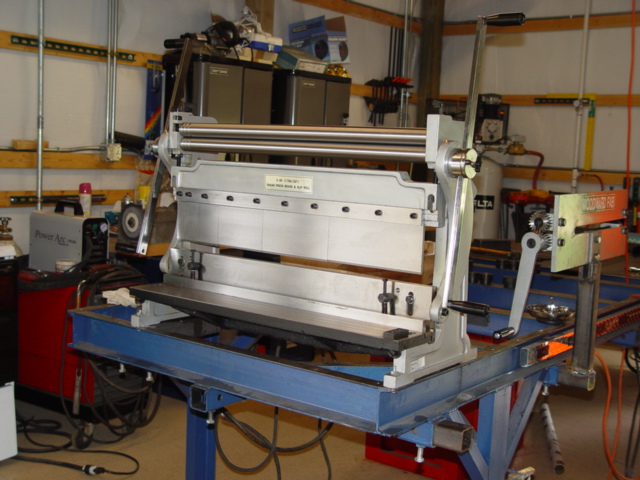
This is our 3 in 1 sheet metal machine. It can roll, bend and shear sheet metal, hopefully it will come in handy when we start repairing the body and floors of our Project COBRA'33.
First distraction was the 3 in 1 Sheet Metal Machine we purchased at the Nationals, in Louisville. It had come in and we needed to find a place to mount it. We choose the end of our welding table, it's easy to access and just the right height. Also, it was plenty strong to hold up the very heavy machine. To get it to bolt to the table, I only had to fabricate one cross-member that would need to be weld in. Not too bad and it only took about 35-45 minuets. Next came the sheet metal roller we purchased at the same event and from the same company, Woodward Fabrication. I used the table's unique receiver type system, and made a mount that would hold the roller and yet allow it to plug right into any receiver mounted under the welding table. This was one of the best ideals I have had, by installing short sections of 2-1/2" square tubing at various location all the way around the table,Just like the receiver hitch mounts used on class III and above hitches, I can litterly plug-in the roller and many other devices I might need. I have the larger 6" vice set-up this way, and it allows me to remove and or position it anywhere I might need it, at various spots around the table. So now the Sheet Metal Roller is apart of that same system, and it too can be positioned and removed very easily, at any time. This took maybe an hour and now I can finally get to the body. My Dad finished drilling and mounting the 3 in 1 machine and he also removed the thick cosmoline like substance covering the machine.
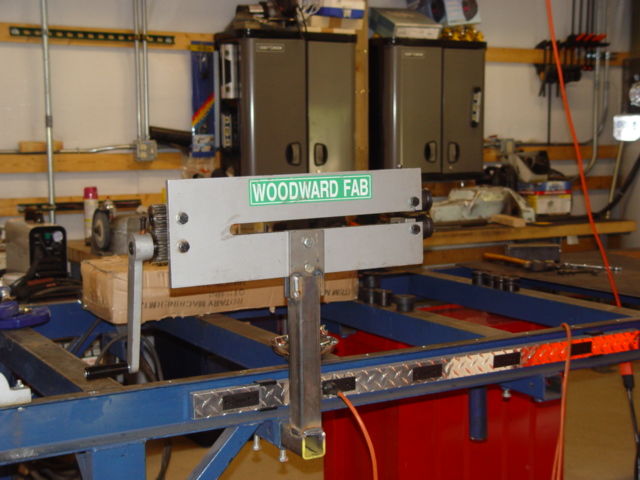
Here's the Sheet Metal Roller, it can press on beads and flanges of many different designs, plus cut sheet metal. I hope to master this piece of equipment while we work on the floor-boards of the '33.
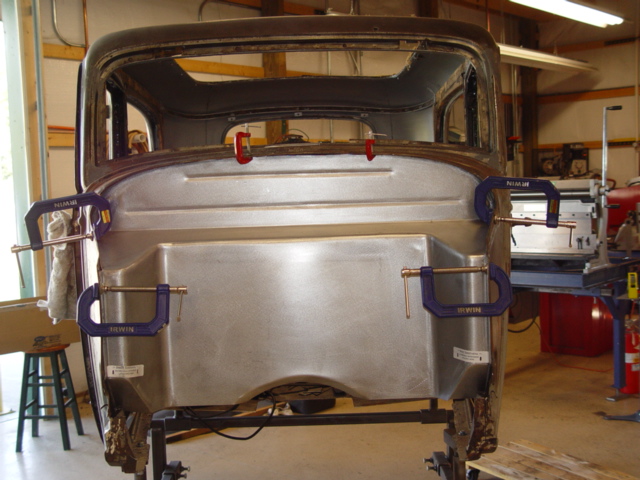
Now to the body, First thing I had to do was to lift the body back up and roll the chassis back out from under the body. While the chassis was out from under the body, I marked all the center locations of the mounting holes, this would allow me to better locate the mounting holes when the body was lowered and covering them up. A simple task that really pays dividends. Next I en-larged the bigger mounting holes to accept 1/2" bolts, the smaller ones that will take 3/8" were go to go.
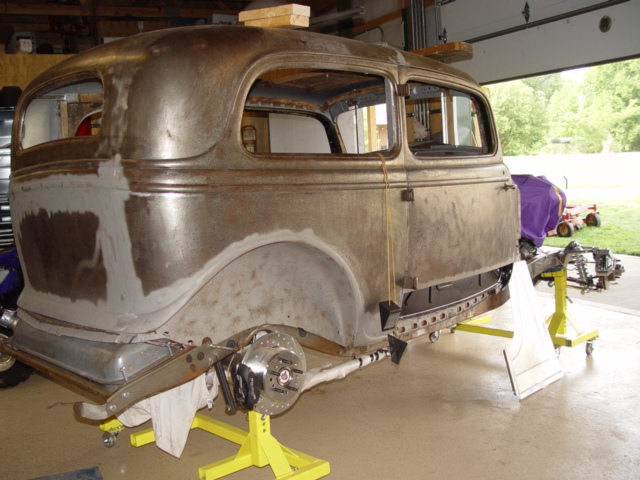
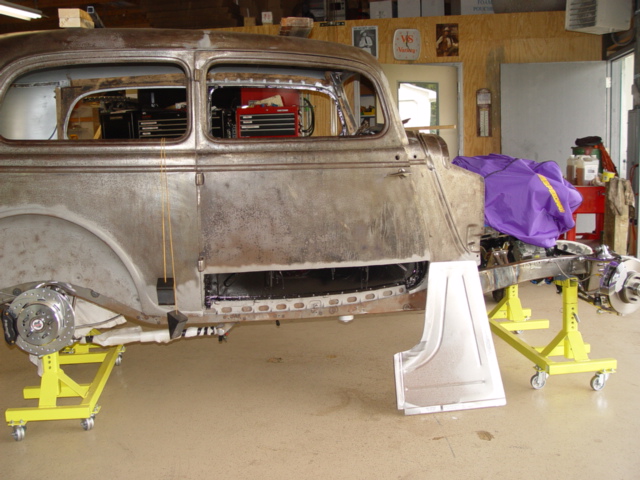
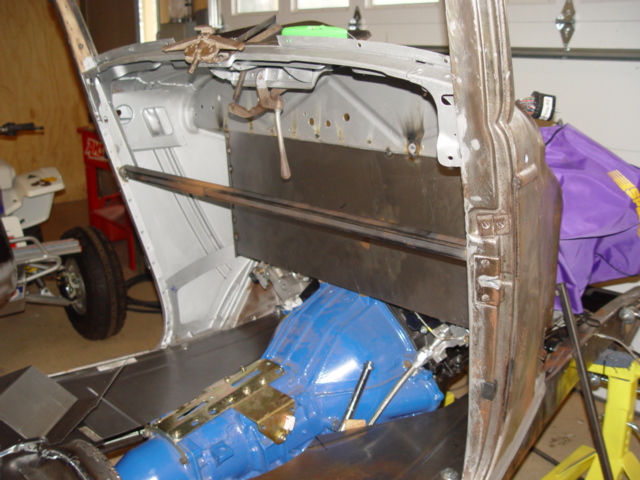
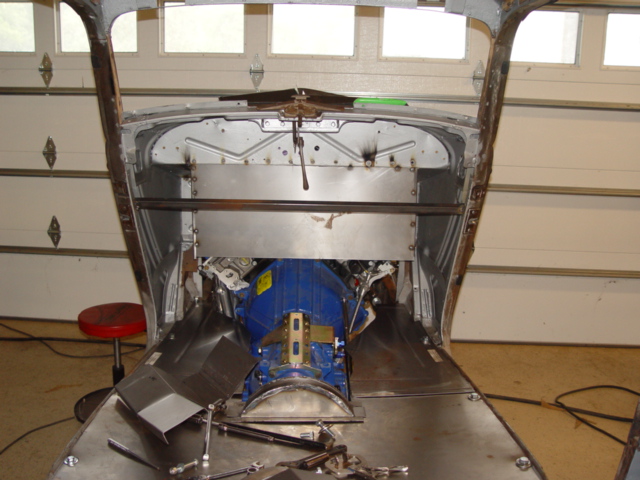
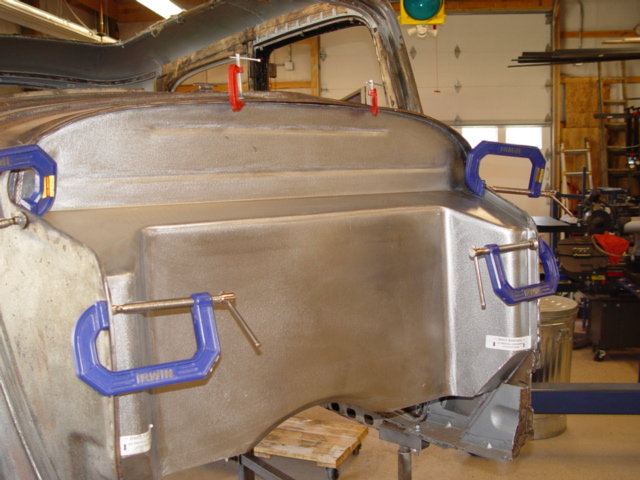
Heres Project COBRA'33 in all her glory! The body is now bolted to the frame, and everything attached to the frame fits inside the body. This is something I had been fearing, that the curvature of the frame wouldn't match the body, or that we mounted something on the frame that would not work once the body was installed. But those fears where never realized, the body fits great. There is neither too much or too little play in the frame, it fits like it was made for this car....Hey I think it was...wasn't it?
The floor needed to be trimmed once again, this time I would trim it much closer to the body mounting surface and since this would be the final trim, I used a saws-All to make the cut cleaner. Now with the floor trimmed, the mounting holes located and the body holes opened-up, I was ready to lower the body onto the frame. With the firewall cut to the right size and the header removed, it was an easy one man job. The body sat right down on the frame and with minimal adjustment, the frame mounting holes were showing through the body mounting locations, all I had to do was to screw in the bolts. It took little time to get both sides bolted down, from the firewall to just shy of the kick up, where the frame goes up and over the rear axle.
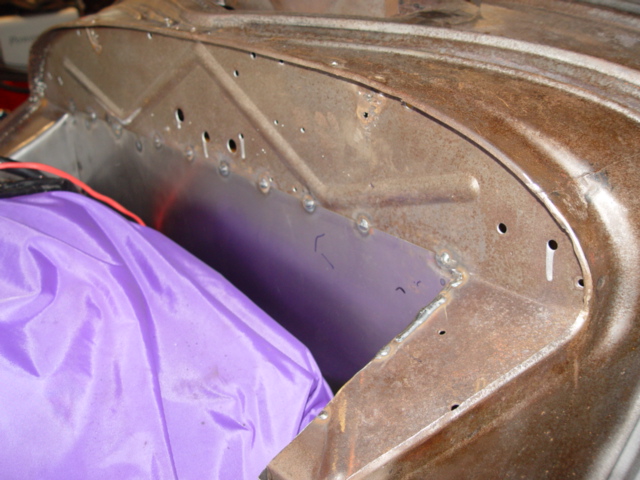
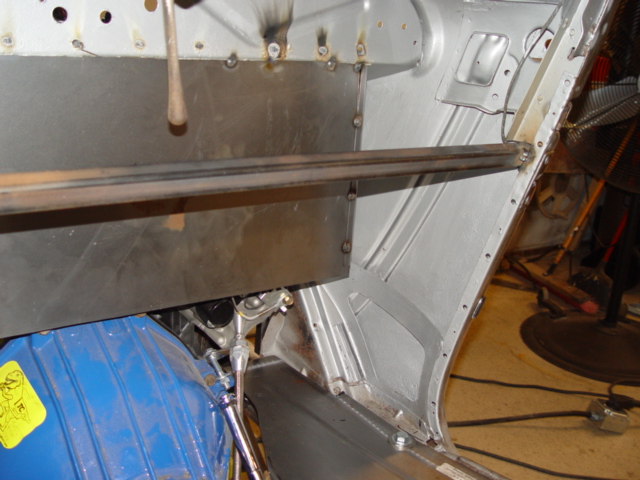
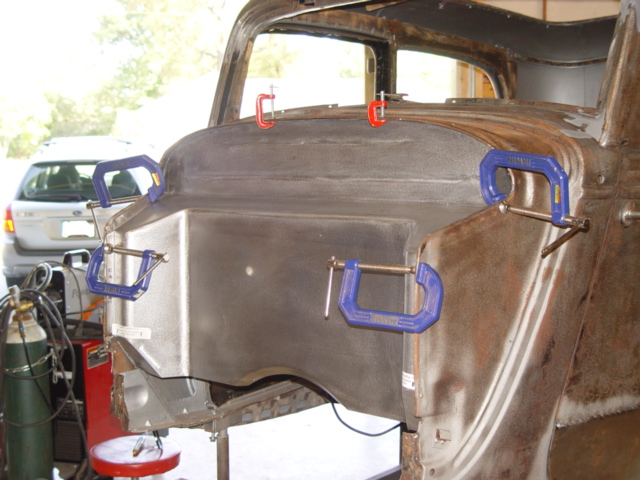
This shot shows just how far back we had to cut the Fire-Wall.....You can easily see where it use to be. I tried to save as much of it as I could, and this is alls thats left. Looking back, maybe we could have moved the engine 1-2" forward, but I'm not real sure. When everything is finished, I will better know if I could have saved some up front, for now we'll just have to go with what we have and see how it turns out.
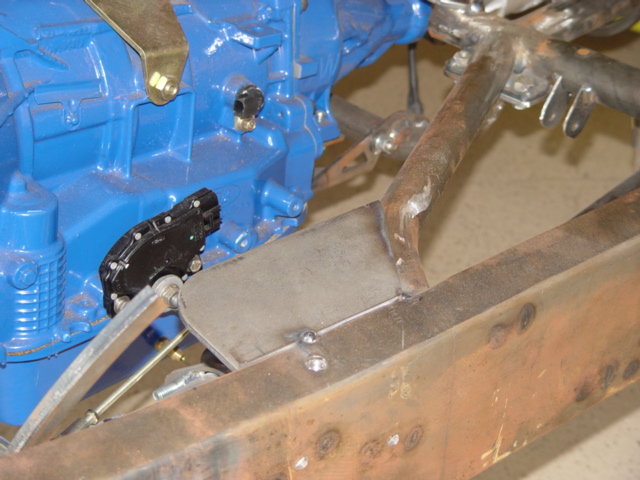
The rear kick-up was another story, I had one mounting bolt in, and that was it, the other mounting bolts were missing! Yes, it looks like we forgot to install the nuts when we welded the under side of the frame, that were meant for their body mounting bolts. This means I had to come up with a plan B. Plan B was to drill through the body and the frame, and then tap the frame with a 1/2"-13 tap. So I crawled back into the rear of the car and drilled 5 holes and then taped them for 1/2"-13 bolts. This wasn't what I had in-visioned, but it did work and made for a secure and very robust mounting system. This was about all I got done on this day, not alot but we did make some head-way and every little bit helps. One thing we noticed as we were cleaning-up, was the drivers side door now no longer closed. The body was pulled down tight with all the mounting bolts installed, and it had the body in a bind. Next time I go down, I'll have to fix that. I'm hoping it just requires a few well placed spacers between the frame and the body. We'll see next time if I'm right!
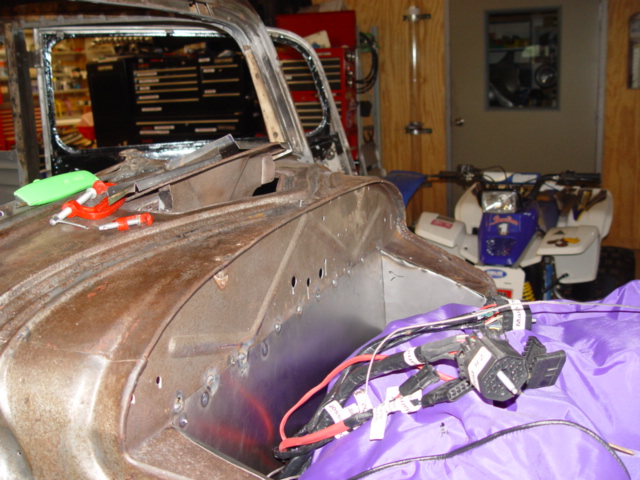
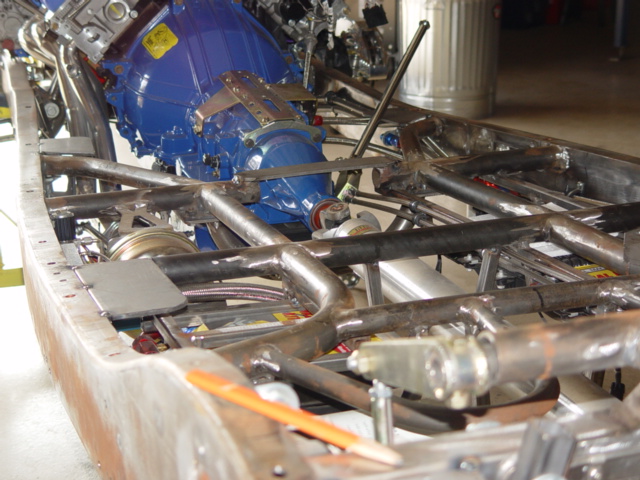
Looking from the other side you can see that space is still very limited behind the engine. All those cables have to plug into there Female counter-parts that get mounted in the Fire-Wall.
Just before I left, I got out the floor panels and sort of checked them for fit. The panels are of coarse to long and wide up front, I ordered panels for a stock fire-wall, this way I could always trim some off, and make them work. Just looking at the floor, I get the feeling there is tons of work to do, but I'm sure once we get going, things will fall into place and it won't take near as long as it looks like it would now, at least that's what I keep telling myself.... Our main problem areas are the back of the transmission, were we installed the hoop, and the kick-up needed to clear the rear cross-member and anti-roll bar. The back kick-up looks much easier now that the body is on the frame, while the front hoop looks harder. I can see now, if I decide to go with a beach type seat up front, it would have to be one designed for a transmission/drive shaft tunnel, even though we will have a flat floor. The hoop, would hit a flat beach seat, while one designed for the tunnel should clear it. These are all little, but important things one learns from doing a job like this, theres just no way anyone could foresee all the little details. This is why experience is so important and why Hot Rod Shops seek experienced workers, there is just no substitute for EXPERIENCE! And you can't get it buy simply reading about it, there are just some things you have to do for yourself.
08-22-07
Today we started on the Sheet-Metal work. First thing was the floor board, and we installed the first of many pieces to come on the floor. I figured the first piece should be the section that goes from the transmission hump to the next rear-ward cross-member. I used some 16ga. Sheet-Metal for this section, I wanted it to be plenty strong, since it is the main section under the front seats, and pretty much sets the body. The floor pan has a very gentle curve to it, so to duplicate this curve, I used some card board to make a pattern from, then transferred that pattern to the Sheet-Metal. Since the two sides are symmetrical, I could use the same pattern for both sides, just flip it over. This section took some time, we had to relieve two (2) areas for the frame horn, just to the rear of the transmission, and all the body mounting bolts on the sides. Once this was fitting correctly, we just bolted it in for now, latter we will weld it in. The new Sheet-Metal 3 in 1 tool worked very well, the more you use it the better it goes, pretty much like anything else. I first set-out to TIG everything, but soon changed my mind and decided to MIG weld the panel in place. It's much faster, and I will TIG weld the joints latter. Oh, yell....I almost forgot. The very first thing we did, was correct the body. We left off, last time with the body being pulled down with the mounting bolts, in such a way that the doors would not shut. I loosened all the bolts and even removed the first few and shimmed up the body in the front. It was pretty easy to tell when you had it right, the doors shut and the body lines were aliened. I had some body shim's and 1/2" fender washers, which turned out to be all I needed. There is a small gap in the front, down between the frame and the lower body where it meets the frame. I will double up on the mounting foam when we install the body for the last time, and it should take care of the gap. I suspect we will have some minor problems when it comes time to fit the front fenders and there inner supports, we'll just deal with that as it comes.
Once the first floor section was in, we turned our attention to the firewall. I wanted to save as much as I could, and really thought I didn't have to do any more trimming, but I was wrong. There wasn't anyway to get around, not trimming some more off the upper portion of the forward facing firewall. We cut it back to the break line, which meant another 4" had to be removed. We also decided to take the cut straight back, unlike the tapered cut we had. There just wasn't enough room behind the engine, and it made no sense designing something that wouldn't be serviceable. Now with the newly removed metal, we can take the firewall straight down behind the engine, and Tye it in to the sides, and still get to all the item mounted on the back of the engine.
First, we had to remove the welded and riveted-on radiator support brackets, clean-up the flat section of fire-wall, and remove a small section of metal from the drivers side lower fire-wall. It was cut at an angle, and needed to be square. While Dad was working on some of that, I made the final cover for the fire-wall from that template we made earlier. This will go on last and will cover some of the seams.
We started on the fire-wall by installing the long piece that hangs down from behind the engine, we took it to with-in a inch of the transmission. This was an easy flat section, that was simply tack-welded to the remaining part of the fire-wall. Then we started on the passenger side section that goes from the side of the fire-wall, back to the piece we just installed. This will in-close the passenger side. This went right in without to much fan-fare, and again we tack-welded it in place. Next was the same section, but on the drivers side, and again it went into place fairly easily. Now we have the fire-wall enclosed on three sides, the top, right and left side. Now all we need to do is Tye in the bottom, install the cover piece I made, and make two small cover pieces and the fire-wall is done. We will have to get that latter, because this is all we got finished today. I'm really happy with the progress, this Sheet-Metal stuff is new to us and it takes time to really learn it. There isn't going to be much room behind the dash, I'm really worried about getting that AC/Heater unit in there.
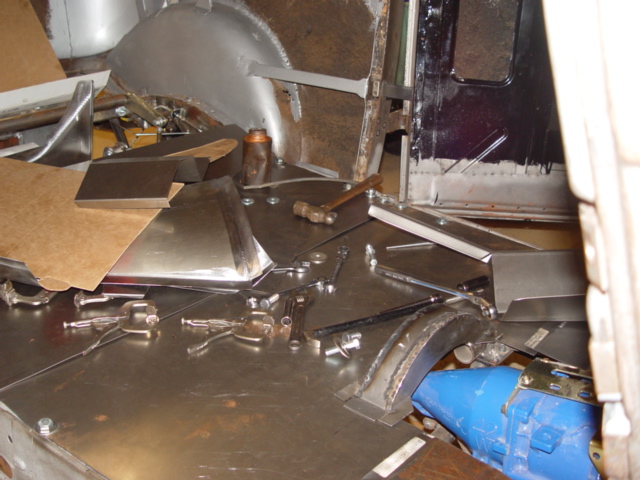
Yes...All the above formed pieces are wrong. While they will no longer serve Project Cobra'33, they will work just fine for more welding practice.
08-25-07
While, today I really found out just how much I didn't know about sheet metal work and how much more respect I have for those that do! We first installed another panel behind the first one we installed, this takes us back to about 1/3 the way up the kick-up for the rear axle. We installed this panel next for several reasons, one it was fairly easy and we needed the momentum. Two, it will help protect the oil coolers from damage. Without the panel in place, things get placed on them and I don't care for it. Third, we needed so extra room, and this gave it to us, and it also made it much easier to get to the rear of the car. So, now you know why we installed that panel first.
After the first panel, we worked on the two panels that go next to the transmission, from the back of it, forward to the firewall. These are the panels that you would most likely step on while in the car. These two were fairly easy and took only about two hours to fabricate. Honestly, they were flat and not to complicated, so we didn't have any problems. After these two panels, we decided to work on the panel that encases the hoop directly behind the transmission. This is more like a round, box like structure, that goes over the tube, so we can tie into it later with more panels. This took some time but turned out just fine. This is the last thing we did, that worked. We turned to the passenger side, and started making a panel that would tie the front of the firewall together with the floor, and sides. This was much more technical, and proved to be to much for us today. I made to different panels and neither one fit worth a dime. After about 2-3 hours, we quit and decided to tackle it again latter next week. These panels were of multiple angle type, we were trying to tie in the sides, front and bottom. These panels would be known as toe panels, they go up along the transmission were it gets tight. It was in this area were we were working and it's very tight. You have the back of the cylinder heads, and you need to leave some room between them and the panel. You also have to trim these as tight as possible, because this is the area where you need to place your feet while riding in the car. With this big, fat engine we stuffed in this thing, much of the original foot room was lost, as was the room under the dash. It would be real easy to just throw in any old panel, but when your trying to save every square inch of room, it gets much harder. Every little bit I can save now, will pay dividends latter when someone is riding in the car. No body likes to feel cramped in, and I don't plan on giving in on this subject. We'll come back another day, and get it that time.
09-04-07
After working on this firewall/floor for some time, I have decided to scrap the whole thing and start over. The firewall will never look right, there are just to many small pieces and the top of the stock firewall has several small, raised sections where they rolled in a few beads for strength. These will hold the top cover panel out and make for an awkward looking final piece. I could actually live with that, but the area where the floor meets the firewall is my biggest concern. There just isn't going to be enough foot room, and why make something that will never be comfortable to drive? Any how, I'm not going to waste any more material or hours on this section of Project COBRA'33 . What I am going to do is contact Direct Sheet Metal and see what they have that might work. They offer a Small Block and a Big Block firewall, the Big Block firewall has a 5-3/4" set-back, which I think will work.
Direct Sheet Metal has a great web site, you can pull down a list with diagrams on it, too measure your body and frame for the right firewall. I took all the different measurements, and then contacted them with the data. Dave, with Direct Sheet Metal worked with me to determine it there Big Block Firewall would work on our Sedan. According to Dave, it will work, it has very similar measurements to a Big Block. I ordered one and don't expect it for about two (2) weeks. This will be a one (1) piece unit and should make the project get back on schedule. I told Dave how we had originally ordered there stock front and rear floors, thinking I could always trim the pieces to fit. But had severely trimmed the front floor board pieces, he included both front toe boards and a new transmission tunnel for free!! What a great guy and what a great company, I have no problem recommending them for there quality products and outstanding customer service. You can contact them at www.directsheetmetal.net .
Any one that has been in a project managers shoes, or in-charge of keeping things running, knows the importance of timing. While most are working on today and now, you have to project yourself down the road, and see whats going to be needed next month, next week, tomorrow. Keeping material and equipment on hand and ready for work is your greatest challenge, and building a Hot Rod is no different then building a office building, they both take planning. So while were waiting for the arrival of the firewall, I took the time to clean-up the shop, clean-up the office, inventory some items and sat down and ordered some parts that we will need in the very short distance. Once this Firewall is together and the floor is done, we will concentrate on the interior and exterior sheet metal. While we have all the exterior metal, I still need some parts so we can fit whats needed inside the door, dash and under the seats. With this in mind, I first ordered some additional wiring aids from Ron Francis Wiring , the same folks we bought out original wiring kit from.
Ron Francis Wiring
WP-35
WATER PUMP RELAY
1
34.95
34.95
FP-35
FUEL PUMP RELAY
1
34.95
34.95
RL-70
UNIVERSAL 70 AMP RELAY
1
23.95
23.95
PL-21
POWER DOOR LOCK WIRING
2
14.95
29.90
PL-21
POWER DOOR OPENING SOLENOIDS
2
20.95
41.90
AC-25
AIR CONDITIONING WIRING
1
12.95
12.95
HE-12
HEATER WIRING
1
11.95
11.95
PA-23
POWER ANTENNA WIRING
1
11.95
11.95
EX-7
COURTESY LIGHT WIRING
1
34.95
34.95
IS-04BL
BLUE KEY SWITCH
1
34.95
34.95
WS-31
2-SPEED WIPER SWITCH
1
29.95
29.95
PS-32
PUSH/PULL SWITCH
1
29.95
29.95
KB-04BL
REPLACEMENT BLUE KEY BLANK
3
3.95
11.85
TJ-32
DOUBLE ROW JUMPERS 10pc
3
5.95
17.85
SHIPPING
28.95
28.95
TOTAL
390.95
These parts are to round out what we originally purchased more then a year ago. It's just as the car progressed, I determined what it was that we would need outside the normal offerings of a kit.
Next, we ordered some stuff from Dakota Digital. Again these are the same folks we ordered our complete dash gages from and the A/C Control panel and rear view mirror. I really like this company, they seam to only offer top quality components and that just fine with me. I don't mind paying more for good stuff, and so far they have been spot-on for quality and customer service. They are also one of the very few manufacturers that offer a lifetime warranty, and if their willing to put there money where there moth is, then I'm willing to pay a little more and go with them.
The Commander-10K, will allow us to make several remote functions, and the 6-button remote is way easier to operate then the industry's 4-button standard. With this set-up we will we able to do the following:
| 1 | 34.95 | 34.95 | |||||||||||||||||||||||||||||||||||||||||||||||||||||||||||||||||||||||||||||||||||||||
| 0 | |||||||||||||||||||||||||||||||||||||||||||||||||||||||||||||||||||||||||||||||||||||||||
| 1 | 34.95 | 34.95 | |||||||||||||||||||||||||||||||||||||||||||||||||||||||||||||||||||||||||||||||||||||||
| 0 | |||||||||||||||||||||||||||||||||||||||||||||||||||||||||||||||||||||||||||||||||||||||||
| 1 | 23.95 | 23.95 | |||||||||||||||||||||||||||||||||||||||||||||||||||||||||||||||||||||||||||||||||||||||
| 0 | |||||||||||||||||||||||||||||||||||||||||||||||||||||||||||||||||||||||||||||||||||||||||
| 2 | 14.95 | 29.9 | |||||||||||||||||||||||||||||||||||||||||||||||||||||||||||||||||||||||||||||||||||||||
| 0 | |||||||||||||||||||||||||||||||||||||||||||||||||||||||||||||||||||||||||||||||||||||||||
| 2 | 20.95 | 41.9 | |||||||||||||||||||||||||||||||||||||||||||||||||||||||||||||||||||||||||||||||||||||||
| 0 | |||||||||||||||||||||||||||||||||||||||||||||||||||||||||||||||||||||||||||||||||||||||||
| 1 | 12.95 | 12.95 | |||||||||||||||||||||||||||||||||||||||||||||||||||||||||||||||||||||||||||||||||||||||
| 0 | |||||||||||||||||||||||||||||||||||||||||||||||||||||||||||||||||||||||||||||||||||||||||
| 1 | 11.95 | 11.95 | |||||||||||||||||||||||||||||||||||||||||||||||||||||||||||||||||||||||||||||||||||||||
| 0 | |||||||||||||||||||||||||||||||||||||||||||||||||||||||||||||||||||||||||||||||||||||||||
| 0 | |||||||||||||||||||||||||||||||||||||||||||||||||||||||||||||||||||||||||||||||||||||||||
| 1 | 11.95 | 11.95 | |||||||||||||||||||||||||||||||||||||||||||||||||||||||||||||||||||||||||||||||||||||||
| 0 | |||||||||||||||||||||||||||||||||||||||||||||||||||||||||||||||||||||||||||||||||||||||||
| 1 | 34.95 | 34.95 | |||||||||||||||||||||||||||||||||||||||||||||||||||||||||||||||||||||||||||||||||||||||
| 0 | |||||||||||||||||||||||||||||||||||||||||||||||||||||||||||||||||||||||||||||||||||||||||
| 1 | 34.95 | 34.95 | |||||||||||||||||||||||||||||||||||||||||||||||||||||||||||||||||||||||||||||||||||||||
| 0 | |||||||||||||||||||||||||||||||||||||||||||||||||||||||||||||||||||||||||||||||||||||||||
| 1 | 29.95 | 29.95 | |||||||||||||||||||||||||||||||||||||||||||||||||||||||||||||||||||||||||||||||||||||||
| 0 | |||||||||||||||||||||||||||||||||||||||||||||||||||||||||||||||||||||||||||||||||||||||||
| 1 | 29.95 | 29.95 | |||||||||||||||||||||||||||||||||||||||||||||||||||||||||||||||||||||||||||||||||||||||
| 0 | |||||||||||||||||||||||||||||||||||||||||||||||||||||||||||||||||||||||||||||||||||||||||
| 3 | 3.95 | 11.85 | |||||||||||||||||||||||||||||||||||||||||||||||||||||||||||||||||||||||||||||||||||||||
| 0 | |||||||||||||||||||||||||||||||||||||||||||||||||||||||||||||||||||||||||||||||||||||||||
| 10 PC | 3 | 5.95 | 17.85 | ||||||||||||||||||||||||||||||||||||||||||||||||||||||||||||||||||||||||||||||||||||||
| Dakota Digital | |||||||||||||||||||||||||||||||||||||||||||||||||||||||||||||||||||||||||||||||||||||||||
|
|
362 |
|
|||||||||||||||||||||||||||||||||||||||||||||||||||||||||||||||||||||||||||||||||||||||
|
|||||||||||||||||||||||||||||||||||||||||||||||||||||||||||||||||||||||||||||||||||||||||
This is quit a list of remote functions and will require many more hours and electrical parts then a more conventional system. All the more reason to buy the best you can afford, electrical gremlins are a pain in the back side.
Next we ordered some additional supplies from Rocky Hinge Inc. . We needed the Power Windows, Door Switches and several other items that they handle. Rocky is a great guy, and every-time I have talked to him he took the time to answer all my many questions, without trying to hurry me along, like so many others do. He also makes some very nice and industry unusual products. Like the outside door handle kit we will install, it allows you to use the original outside door handles and still have power doors. Just what I wanted, I'm really tired of seeing all these striped down, clean look cars. It is a neat ideal, removing all the exterior parts and trim pieces for a clean look, but everyone does it now, and the cars loose there personality. I like the old look, I like my door handles to show, I want to keep my Cowl Vent and I'm not going to DX the taillights in favor of a French-in light. It's the original trim pieces that give the cars their personalities. I'm all for small little twist of the original pieces, but just don't eliminate them altogether.
Rocky Hinge Inc.
| BCP-001 | SLIM LINE DESIGN W/POWER LOCKS | PR | 125.00 | 125.00 |
| IP-01 | Idler Pulley Kit W/Bear Claw Cables | PR | 28.00 | 28.00 |
| BH-01 | EXTERIOR HANDLE MOUNTING KIT | PR | 125.00 | 125.00 |
| PWK-01 | POWER WINDOW KIT | PR | 215.00 | 430.00 |
| WE-001 | WINDOW EXPRESS | KIT | 35.95 | 35.95 |
| PWS-01 | POWER WINDOW SWITCHES | PR | 98.50 | 197.00 |
| SHIPPING | 18.97 | |||
| TOTAL | 963.92 |
Next order came from Sonic Electronics, we ordered several pieces of the stereo system. mainly the front and rear speakers, amplifiers and the sub-woofer. Eventually the head-unit will be a Pioneer AVIC-Z2 Navigation unit, but that piece will have to wait till later on down the road. The speakers are needed so we can fit them into the doors and side panels. Same goes for the sub-woofer and the Amps.
| SONIC ELECTRONIX.COM | |||||||||||||
| 9/10/2007 | |||||||||||||
| 1 | Pioneer PRS-D2100T 2-Channel Amplifier | 1 | 219.99 | ||||||||||
| 2 | Pioneer PRS-D4100F 4-Channel Amplifier | 1 | 247.21 | ||||||||||
| 3 | Polk Audio MM2084DVC Momo 8" Subwoofer | 1 | 79.98 | ||||||||||
| 4 | Polk Audio MMC5252 Momo 5-1/4" Component Speakers | 1 | 188.5 | ||||||||||
| 5 | Polk Audio MMC6500 Momo 6-1/2" Component Speakers | 1 | 189.98 | ||||||||||
| Total Investment | 926 | ||||||||||||
This was it for the ordering for a while, and should keep us plenty busy. I suspect the next order will be for the front and rear seats. We'll just order them in the bare steel frame for now, then have them padded and covered latter on. We did pick-up a small Aluminum radiator that I hope will work with our Inter-Cooler. It's a new Motorcycle radiator, and I'm hoping to mount it to the back side of the fan shroud of the main radiator. With the size and design of the grill, nothing could get behind it and mount to the front of the radiator. We'll see how it goes as things progress.
09-19-07
Today was a great day to work on Project:Cobra'33. And first on the agenda was to remove the body and cut out the Fire-Wall. The body was all set to be lifted off the chassis, so that went super fast. We have done that so many times that we are pretty darn good at it by now. Once off, I got to removing the Fire-Wall from the body. I left a good 3/4" all the way around just in case we need it. I think the Fire-Wall will take the place of the old one, and weld right into the cowl, but just in case it welds in to the lip of the old Fire-Wall, I left plenty to weld to. It's ready now when the Fire-Wall get here either way.
Next up was locating and fabricating some Roll-Bar mounts. I want to make some heavy brackets that I can use as a base for my Roll-Bar hoops latter on. Right now I'm not too sure what type of roll over protection we will build, so I'm leaving three (3) mounts per side to tie into latter on. The first mount will be the "B" pillar mounts. These are the ones right at the "B" Post, or the post that the front doors are hinged off of. I figure the hoop will come down some where around the back on these pillar, so I built some mounts that stretch from the "B" pillar back about 8" . These mounts get welded to the inside of the frame and connect to one of the cross-members. We used some 4" x 8" x 1/4" thick plates and formed them to the area. They are very heavy duty and should support the Roll-Bar hoop very well. Next we made two (2) more plates out of the same material for the "C" post or very back portion of the Roll-Bar. These were welded to the rear cross-member (the same one the shocks are mounted to) and were a bit smaller at 4" x 4" x 1/4". Here, I don't foresee a Hoop, but more something like legs or support pieces for the main hoop, and the mounts will be more then strong enough for the job. Up front, we also made a provision for a hoop or leg to mount just below and pretty much even with the front of the dash. Here I can see a hoop that very closely follows the couture of the dash and roof line. This hoop would rest on these forward mounts and tie into the main hoop which is just behind the "B" pillar or front seats. It would be nice if I could fab up some nice form fitting lower bars that would also tie into the lower front and main hoops. This would greatly strengthen the body and roll over protection device or Roll-Bar. Know matter what we end up doing, we have left enough mounts under the body to successfully and effectively support any Roll-Bar we may build.
These are the plates we tack welded into the frame for the roll bar mounts.
With the Roll-Bar mounts tack welded in place, I set off to make some lower hoop brackets that will bolt to the mounts we just installed on the frame. These are 4" square pieces that have 4-3/8" holes drilled into them, and when finished will have the hoops welded to the tops and then be bolted to the frame mounts with 4-3/8" bolts. While I was drilling and cutting the 4" square pieces, Dad was marking and cutting the transmission hoop out. Back when we were fitting the engine and transmission to the frame, we bent a small hoop that tied the cross-member together where the transmission is mounted. This hoop seemed to be OK then, but now it only gets in the way of installing a smooth floor and the front seat. The floor I could live with, but the front seat interference I can not. The fix was to cut the hoop out about 3/4" up from the cross-member where it attachés, then weld in a flat piece to span the distance. Dad cut the section out and fit up a nice looking piece to span the gap. I tack welded it in, and I think it will do just fine, the floor now can be run fairly smooth and after all the insulation and Dyamat is installed, it won't even be noticeable or seen. Why we didn't think about that when we first installed that piece, who knows?? But the main thing is we fixed it and the repair is a good one.
The packages from Dakota Digital and Rocky Hinge have all come in, and everything looks very nice. The power window kit from Rocky Hinge seems to be a nice and complete kit, I'm glad I went with them. We also removed the lever and spring from the cowl vent. I was looking it over to see how we might mount the power kit for it, there isn't much room at all, and I still have to get that radio in the same area?? We have to see how that turns out latter down the road, but for now it looks tough.
09-20-07
Today was a real nice and slow day, I got to powder coat for the first time and that was pretty cool. We only worked on the car a little, with the fire-wall out, we can now get to many areas under the dash and around the car that we couldn't get to before. Dad painted all the areas with Silver Bullet paint, and helped me clean up some of the parts for Project:Flathead. Next time we'll start working on the doors and other body areas that need attention.
09-23-07
We started working on the Lower door skin replacement panels. Dad already had most of the work none on the drivers side so it went fairly quickly, then we started on the passenger side. Way back when, we cut the doors out in preparation for these panels, so that was done, but there is alot of fitting to do if you want them to look right. Dad has done most of that work, as it's kind of a one man show, with me stepping in to hold something every once in a while. We did decide to use backing strips behind the panels, and I think that was one of our better decisions. The old steel is so oxidized, that it don't weld that great, especially when you try to make a butt weld, it wants to bubble-up and fall apart. The backing strip gives us something substantial to weld to, and also fills the gap very nicely. The end product is a stronger, nicer looking joint that will require much less filler down the road.
If you have followed Project:Flathead , you'll know we just painted the oil pan a nice looking Smokey Grey metallic. I was trying to pick a color that matched closely the color I want the frame to be. And I think we got it on the first try, this is a great looking color, and I think it would look fantastic on the frame. Well, I painted the oil pan for some practice, since I don't spray paint things very often, or at least not automotive paints. The oil pan turned out very nice and I really enjoyed the painting process. I was setting down to order most of the supplies we will be needing latter on and the total came to almost $2600.00. The major expense being the safety equipment, like the fresh air respirator and all it's accessories. So, to make the most of my money I have decided to NOT powder-coat the frame. Yell, I know....but to have it and all the small stuff Powder-coated it will cost roughly $1600.00, Or...I can paint it all for under $400.00. I'll have all the equipment, cause I have to have it for the body...so it only makes sense to paint the frame myself. The other plus, is that if I do scratch the frame, I will have the color on hand to repair it, try that with powder-coating.
The plan now is to order the painting equipment this week and have it ready for use. The frame is getting pretty rusted (surface rust), so I would like to have it sprayed by the end of October, which was the original Powder-coat date. The frame is one of the easiest parts to paint, we have the frame rotary rack, so it would be very easy, and I get even more valuable practice time. So, thats the plan....What do you think??
The frame is really done, I just need it to fit the fire-wall. So, after the fire-wall comes in, and we get it fitting, I'll start tearing the frame apart for final welding, grinding, sanding and sand-blasting. The paint job is a one day deal, once the prep work is done which I suspect it will take about 80 man hours. I'll get some pictures of the doors, and keep you up-dated with my next entry, till then keep it safe.
Project COBRA'33 after the firewall has been removed.

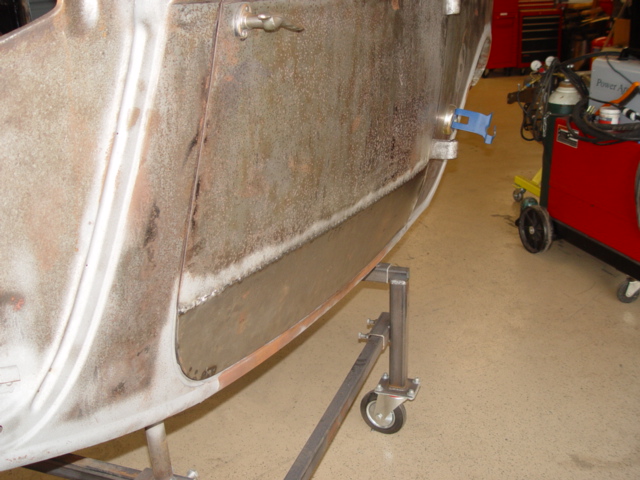
Drivers side door after lower door panel install and new lower inside door panel.
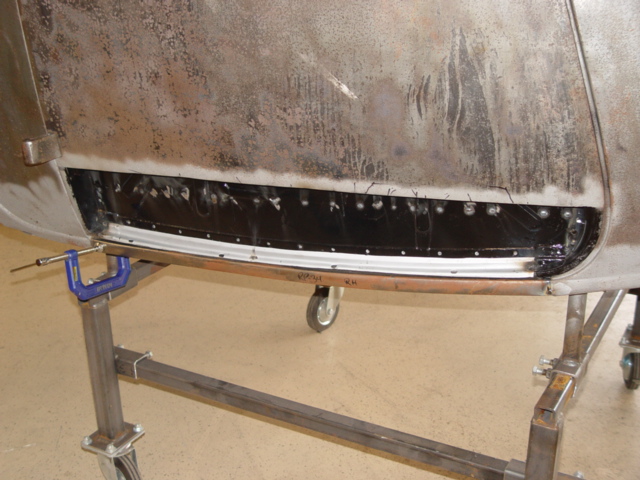
Passenger side door with new rocker panel and lower door panel installed.
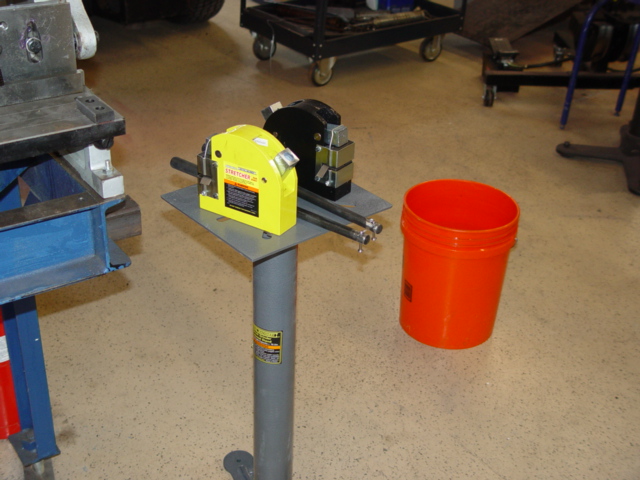
Here's are newest shop tool....a shrinker and stretcher for sheet metal.
09-28-07
Today was a great day, the new firewall from Direct Sheet Metal came in yesterday, and I got to install it today. I left some material around the cowl where the old firewall had been, just in case I needed it. Well, I didn't, the new firewall looks just like the old one in regards to the style and shape of it. So...first thing I had to do was to remove all the old firewall that I had Left. Next...I started by measuring the new firewall and comparing it to the old one. No problems here the new firewall is an exact duplicate. Man those guy's and gals at Direct Sheet Metal sure do a great job, This thing is spot on, and fits like a glove. For now I only clamped it into place, latter when I have some help. I'll position it better and weld it into place. I also received the new floor pieces and transmission tunnel, they will go on also the next time I get to go back down to the shop. This is really starting to come together, and I don't think I'll have any problems making my October deadline for having the frame painted. Speaking of which, I remembered to grab the can and take it with me. That way tomorrow I can get 3-4 quarts more made-up at the local Parts Plus. I did look into getting the frame paint from House of Kolor. The whole Ideal was to use their paint and products, so I can get some earily practice. They had an Orin Silver that is very nice looking, but I still like my color I got for the Oil pan(Smokey Silver metallic) better. So...I'll use all their products for the prep, like the Bare Metal Primer, Wax Remover, Sealer and then spray it with the other paint, the Smokey Silver Metallic. All in all, the frame will get three (3) coats of Smokey Silver Metallic and two (2) coats of high gloss clear. As you can see from my pictures, the frame has alot of surface rust on it. Together with all the welding and clean-up, it's going to take some time to get it in paint ready condition. I think my original estimate of 80 man hours is still valid.
I just quickly clamped the firewall in place. Latter on when I have some help, I'll get it placed a little bit better.
Man..doesn"t this firewall look a lot better then that other thing we were trying to piece together!!. There's nothing like a new firewall from Direct Sheet Metal.
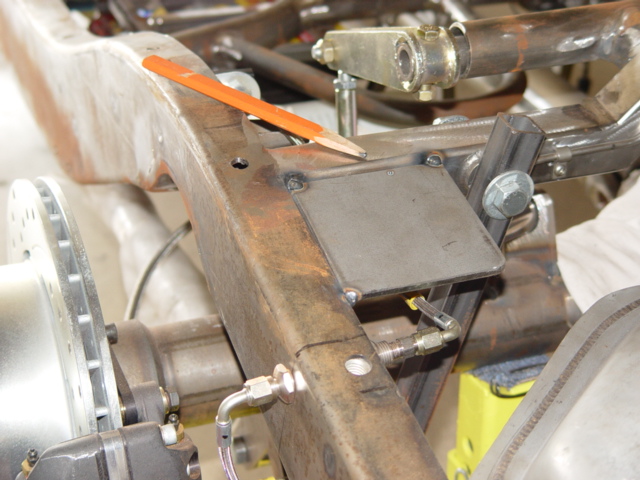
After the firewall was clamped into position, I started back on the roll bar frame plates. If you remember, I had tack welded the frame plates in position and cut all the matching inside plates to size and drilled them. What I did today was assign all of them a place, mark them and then drill the frame plates to match the inside plates. When the body is re-positioned back on the frame, the frame plates will be under the floor boards. The floorboards will run just over the frame plate, and the inside plates will sandwich the floorboards between the two plates. Of-coarse the roll bar will be welded to the inside plates, and then the inside plates will be bolted to the frame plates. This should make for a very rigid structure, and when dealing with a roll over protective device, that's just what we want. By drilling the plates now, I will save myself a lot of frustration latter on. Each plate gets 4-3/8" holes, I clamped the plates together, then drilled one hole and bolted the two plates together. This makes sure the plates don't move, and to further make sure nothing moves, the next hole also got a bolt thru it. Then just drill the next two holes. I repeated this six (6) times, and the job was finished. Each inside plate has a number, and each frame plate has a number, these must match and there is also a location tang to further Aline the plates. So.. down the road when we will be installing the roll bars, we won't have any problems aliening or matching the plates.
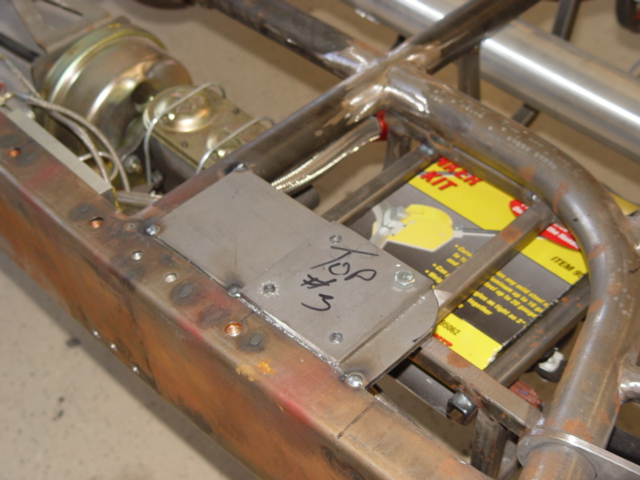
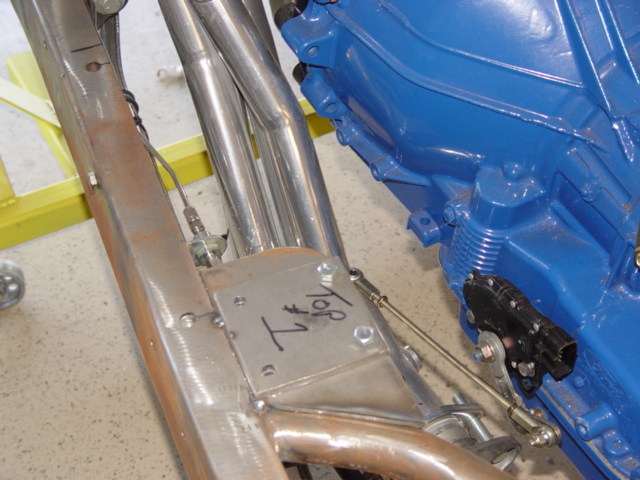
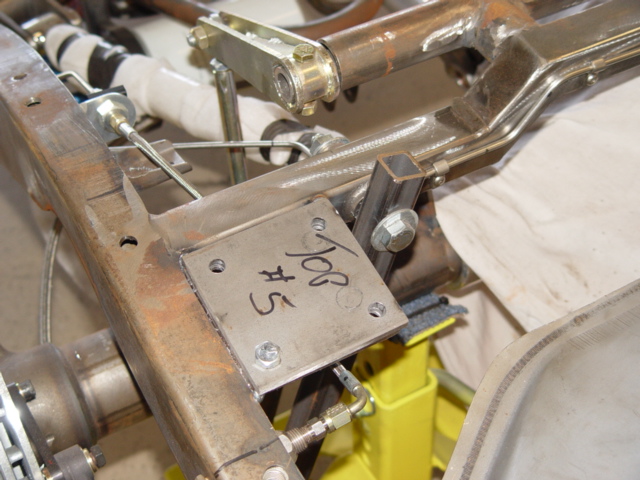
As you can see, the frame plates have been tack-welded into place and the smaller plate on top is the inside plates that will get bolted in place. The floor-boards will pass between the two (2) plates.
10-01-07
Today was a series of highs and lows. We started out by setting the new firewall properly into the cowl of Project COBRA'33 . This time I had some help and got everything centered and aligned properly. With this part over, I welded the firewall into position and we lower the body down over the frame to see what we have. And what did we have.....More work. The firewall was way to shallow, we needed at least two (2) more inches to get the engine to fit. This is were those lows came in....I just knew it couldn't have been that easy. We talked about all our options for several minuets, but the only real option was to section that nice new firewall and add the needed room. True fully, that was the last thing I wanted to do, cut up another firewall...but it had to be done and we had plenty of cut-off disc, so off it came. We laid out a plan that would allow us to section the firewall, just enough to get the added room, yet not totally kill the new firewall. We marked up the firewall with a bunch of black sharpie lines, and after everything was evened out, we set to cutting. The plan was to add in a 3-1/2" swath to each side, yet do it in a fashion that would still look nice. To make the filler panels, I cut two (2) pieces 4-1/2" wide, then rolled a flange on both sides of each pieces, roughly 5/8" wide. This allowed us to insert the pieces, and still have plenty of material on each side to weld too. We also had to form a 90° bend on the top, and manipulate the to sides about 20° too get them to mate-up to the rest of the firewall. All in all, the fix wasn't nearly as bad as It could have been, mainly I think because we were now use to making panels and using the sheet-metal tools. This is were the experience comes into play, and if this problem was that much easier to fix with the limited experience we gained on the last firewall, I wonder how easy this might have been for a real seasoned pro? From everything I have learned so far, the best advise I would have to those that do run into unexpected problems would be to stay calm, assess the problems, and work through your list of mental fixes till you come to the right one for the job.


These are all the different views of the new Direct Sheet Metal Big Block Firewall. They really did a great job making it. The fit was spot on and the workmanship was terrific! I only wish we could have kept it like you see it here!!
Welding out the firewall. Now with the two (2) filler pieces fashioned out of a sheet of 16 Gauge sheet metal, we set to welding everything in and finish welding the firewall in place. The two (2) filler pieces were somewhat easy, starting with the passenger side, we clamped the filler panel in place and made small adjustments to it till it was perfect. With the over lapping joints, I tack welded the panel into place from the inside, while Dad pushed the filler panel flat from the out side. This assured our joints were smooth and aliened, so the panels looked there best from the outside. Once the first panel was complete, we simply repeated the process for the drivers side panel. Now with everything installed, I welded out the rest of the firewall. This firewall, turned out very stout, and even after adding the two (2) sections, it was a very strong and complete structure, but more importantly, it was a sound and


This is Dad as he cuts the new firewall into pieces.....

Here we have the firewall cut and you can see the 3-1/2" gaps on each side. We also had to cut the firewall across the top, here it has already been re-installed. Since we cut the top portion where not only had it been formed but also welded, we had to break out the torch and heat the metal and then pound out the ridge till it was flat again. You can see the effects of the heat on the surface of the sheet metal.


These two photos, show the right and left sides with there respective gaps.


Here you can see the firewall after the patches have been install and the finish welding done. I welded everything on the inside so it will still be completely smooth when finished. The spots you see are from the heat of the welds that are on the other side. The only evidence of the surgery will be the top seam, but that too will almost disappear after some body work.
Now comes the true test of all our efforts.....putting the body back on the frame. We pushed the frame back under the body and positioned it like we have none so many other times. What was once a task, is now more like a well worn routine, one that only takes seconds instead of minuets like when we first began doing this. With the frame now in place, and the body starting to drop down over it, it's very clear that this is going to be the last time we have to do this little exercise. IT FITS!! Yes, the engine fits very nicely into our newly modified firewall recess, and we actually have some room behind the engine. What a feeling, after all the troubles, time and expense, we finally have the fit we have so desperately been shooting for. The draw back?? Well we now have even less space inside to mount the Air Conditioning equipment, cowl vent motor, AC duct work and I can see some very tight and trying times ahead when we mount the steering. But that's all part of this hobby, and you deal with one emergency at a time. All of this extra work would have been eliminated if we would have just used the very popular Chevy small block engine and the 350 transmission. Or perhaps the 302 Ford engine? But thats not what Project COBRA'33 is all about. I suspect this Engine/Transmission combo has cost us in excess of $15,000 more then if we would have just run a more traditional/popular engine combo. I'll no more when the project is over, but I believe I'm very close now.


These are two pictures of the firewall with the body back on the frame. As you can see, there is plenty of room now behind the engine, and too each side. We should have no trouble getting the plugs for the injection system and engine control mounted on the firewall.
10-02-07
With the Firewall issue now at hand, It was time to take care of several items, all of which we will be needing very shortly. Up first is the issue of seating. Project COBRA'33 will not be re-using the original seats. There are several reasons why the will not be going back into the car, but the first and foremost reason is comfort. The original seats were OK back in 1933, but in 2007 there are just way to many options available to stick those old and UN-comfortable seats back in-side the car. My choice for replacement seats will be Glide Engineering. They sell seats for just about anything made, and I really liked the offering available for the 1933 Ford Sedan. I choose to go with their SPS-334, which is a tapered split back Sedan Seat Fame. I like how it reclines into 18 positions and moves forward to allow rear seat access. The design is good and allows for alot of bolstering.

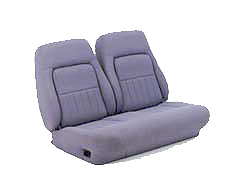
These are pictures of the front seats, note that the bottom picture is just a representation of the finished product and not the colors or material we will be using on Project COBRA'33.
This is the rear seat, the back folds down and the seat bottom pulls up for access to the floor board, which in our case will give access to the fuse panel, and the Telorvek panel.
| Glide Engineering | ||||||
| 10/1/2007 | ||||||
| Front Seats | ||||||
| SPS-334 1933 Fors Sedan Tapered Back Bench | 525 | |||||
| LF Front Lumbar Control | 2 @ 135 | 270 | ||||
| FH Front Heated Seats | 2 @ 150 | 300 | ||||
| FF34 Front Seat Foam | 160 | |||||
| Rear Seats | ||||||
| R-32 Rear Seat | 460 | |||||
| S-19 Rear Foam | 135 | |||||
| 1850 | ||||||
| Shipping | 193.96 | |||||
| TOTAL | 2044 | |||||
This is a copy of the order to Glide Engineering, we purchased one (1) front and rear seat frame, two (2) heated seat units and two (2) lumbar support units, along with a complete seat foam package for each seat. It may seem like the order was pre-mature, but the only item in stock was the front seat frame, the rest has a 3-4 week back-order associated with it. On vehicle specific items like these, you have to think way down the road on them, so you have them in hand, when it's time to use them. Yes the $2,044.00 bill hurts, but you have to have seats in your car. Just wait till we have to have them covered or upholstered, purchase the seat belts and all the trim they will need, and this price will most likely double.


These are some of the many items we purchased from TPC Global.
Next up was the order to TPC Global . I am going ahead and ordering all the paint related items we will need to both paint the car body and frame. Please note this order does not include any paint for the body, that will come latter when we have decided upon the color combination for Project COBRA'33 . When we do decide upon the color combo, we will use only House of Kolor products to complete the project. This order to TPC Global involves painting related supplies and equipment, and will be used for both the frame and body painting process.
TPC Global Order
|
As you can see, the money it takes to build a project like ProjectCOBRA'33 adds up very quickly. We had already placed one order to TCP Global back in the early summer for another $1,500.00. That got us some sand paper, masking supplies, sanding equipment and primer. That order plus this one to TPC Global cost us over four (4) grand. In all honesty, we should be done with the autobody supplies except for the final paint on the car, which will cost roughly another $1,600.00. Before this last order, we also swong past our local Pats Plus dealer for the frame paint. We had visited them earlier for some paint for Project:Flathead, another project we are undertaking. For the frame, we needed one (1) gallon of Smokey Silver Metalic and one (1) Gallon of clear. That bill was like the following.
Parts Plus
09-21-07
DITJC661-QT Hi-Gloss Multi-Panel 15.85
DITJH6670-8OZ Fast Topcoat Hardener 12.85
DITJR506-GL Medium Reducer 20.00
DITJH6002-8OZ Hi-Gloss Enamel Hard 12.00
DITJEB-QT Acrylic Enamel 21.00
D/BAF44L Dura-Block 50.49
TOTAL 140.12
09-30-07
DITJEB-GL Acrylic Enamel 75.15
DITJH6002-PT Hi-Gloss Enamel Hard 19.95
DITJR506-GL Medium Reducer 20.00
DITJC620-GL ACRYLIC URETHANE CLEAR 51.75
DITJR505-QT FAST REDUCER 8.15
TOTAL 188.45
For more coverage of Project COBRA'33 Please go to Frame Build-up V. See you There.