|
Project
Boss 302…
Update 1; Installation of QTP Boss 302 Exhaust Cut
Outs

Truthfully, if there was
ever a car made that begged for an exhaust cut out, it has to the 2012-2013 Ford Mustang Boss 302. The
vehicles come with factory installed " Sound Tuners" that are simply plates with a small 3/8" hole in it, these
plates allow exhaust gases to pass through the small orifice and into the factory mounted side pipes the Boss 302 comes with.
The factory plate, is very restrictive, but the whole idea was to have the system in place, so the end user could make
better use of it. Yes, can you believe it, in today's world of political correctness, environmental
regulation and posturing, among higher gas prices and more stringent federal gas economy laws…that Ford would not only
come out with a aggressive performance car, but help us modify it for a better sound and performance on or off the street.
Well its true, and with very little effort, you can modify your Ford Mustang Boss 302 or GT equipped with a Boss 302
exhaust system. Yes, even the GT can be easily upgraded to this exciting new exhaust system!
Ford made it very easy for everyone, just buy the Boss 302 rear exhaust system, and bolt it right up to your GT's
front most exhaust, and WA- LA, you have instant side exiting exhaust and supper bad sound and looks. Once
the right exhaust system is in place, or better yet, if you're starting out with a Boss 302, in no
time you can install thus QTP exhaust cutouts, and be on your way.  What the QTP exhaust cut outs do is replace the restrictive small hole factory plate, with an electrically operated
full diameter valve, capable of completely closing off the side pipe system, or opening it up fully. The
sound, and thunder you receive is totally in your control, as you can open the valve from the comfort of the driver's
seat, only a little to mimic the factory sound, or crank it open a little more or all the way, what every suits your taste
and style at the time. The electric valves are made of Stainless Steel, and the electrical motors that
operate the valves are enclosed in water tight enclosures to protect them from the elements, so your new exhaust cut outs
will function each and every time you need them to, for a long, long time. Let get started. Installing
the Cut outs under the car. As in all motor vehicle
work, you have to use your head and work safe. Never get under any suspended vehicle unless it is positioned
right and has at least two supporting concepts. Positioning means the car is on level ground, the tires
are blocked from rolling, and breaks set. The two supporting concepts referrers two the lifting mechanism
and the supporting mechanism, they are not the same piece of equipment. If working under a 2 or 4-post
lift, make sure the locks are being used, these keep the car from lowering itself if there was to be a hydraulic leak or failure
of a hose. If working on the ground, use a lifting jack to raise the car, and supporting jack stands
to support it once up in position. The lifting jack can be used as a secondary safety if you want, but
its main purpose is to lift the vehicle, the jack stands support the weight while you are under the vehicle. Trust
me, I've seen the after effects of a car that fall off a jack, that did not have any jack stands for primary support.
One time it almost killed my father while we were both working on his car, I was about ten years old and luckily watched
as by dad managed to just clear the falling car. The other time wasn't as pretty, while on the local
fire department, I responded to a call were a car fell on a person while working underneath it, the outcome was much worse
this time, his family looked on unable to help as the man struggled to breath with the full weight of the car upon him.
He wasn't as lucky, and died there in front of his wife and several children. Safety is not
something to take lightly, make shortcuts with or ignore….its deadly serious stuff my friend. I like working
on cars, but don't want to die doing it. Once
the car is in position, safely….The mechanical stuff is real easy. Ford engineered it that way.
Simply remove the two bolts on each side of the "Y" pipe that splits the main exhaust off for the side exhaust,
remove the factory blocking plate with the small office in it, and in its place, install one of the electrical exhaust cut
outs. Just install the cut out as directed by the instructions, and mount it with the two bolts you removed.
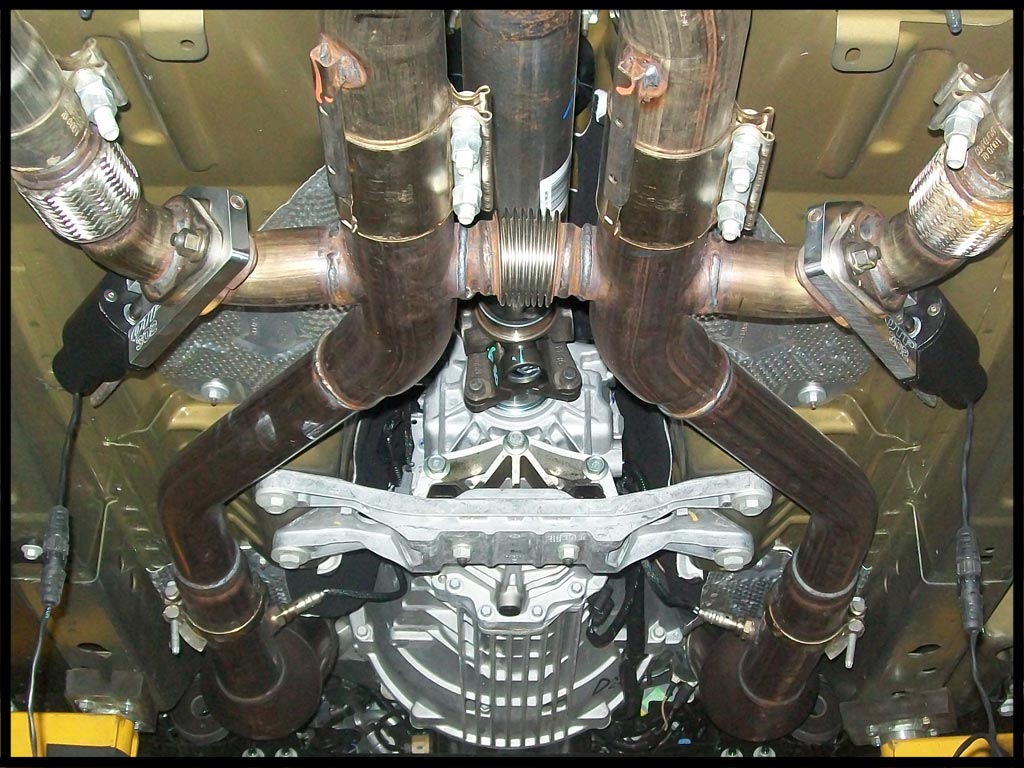
literally, it’s a 2-3 minuet job per side. The cut outs will look like the photo, up-tight
to the underside of the flooring, with the motor portion of the hosing in-line with the tubing. The system
has SS flex joints welded into it, Ford did a great job here, as this makes it very easy to install the cut outs, and remove
the factory plugs. I would use a little Anti-size on the bolts to make later access much easier down the
road. All gaskets are re-used and the orientation of the cut outs are as shown in the photo.
Now simply hook up the wiring harness to the leads coming from each motor, I labeled mine in case that would be an
issue later on, but it's not required. The wiring has to be run up the driver's side to the front/under
hood area, so we can pass the control wiring through to the inside of the cabin. The driver's side
is easy to route, but the passenger side has to cross over the exhaust, and then catch up with the other wiring harness.
I ran my wires forward slightly and crossed over at the transmission mount, as this gave be a great place to support
the wires and keep them well off the hot exhaust pipes and from snagging on something from the ground. You
have plenty of wire, the main goal here is to find solid attachment points and keep it neat. Some like
to go up through the transmission tunnel and into the center consul. If that is your route, be very careful,
you are dealing with not only very hot surfaces, but also ones the rotate, and levers that shift. I chose
to route my wires down the driver's side, and up and into the under hood compartment. From there I
used the Sound pipe hose and its firewall hole to run my wire inside the cabin. I also picked up the 12
Volt DC power and ran that across the back of the firewall and over to and with the wiring harness that passed thru the hole
in the fire wall. I took both the ground and the 12 power (+) wires to the battery, it's easy to access
and why not. Just make sure you use a inline fuse holder and an appropriate fuse to protect the power wires,
and installation. Once you have everything inside the car, it's about over. I chose
to mount the toggle switch that operates the two motors on a simple aluminum mount I made, that mounted to the right and under
the dash. It is easy to access and out of my legs way when I operate the gas pedal, brakes or clutch.
If you're going to mount the switches in the dash itself, be very careful of the location you chose.
Be sure nothing is behind the dash that might get damaged if drill into. I looked at the transmission
tunnel installation, but it made no sense to operate from that location, very, very un-natural and uncomfortable.
In my case, once I fashioned a simple switch mount from a 2' x 1/8" thick section of angle aluminum, I simply
mounted the switches in the mount and drilled two holes for the mounting bolts, done. Also, you do not
want to cut any of the excess control harness. These cables plug in to each other, so simply wind up any
excess cable and fasten it up and out of the way. I had only about 12-14 inches on one cable and about
36 inches on the other, the power(+) and ground(-) wires we ran from the battery can be trimmed to length, and attached to
the appropriate wires. Now simply install the fuse, and test the system. It takes about 5-6 seconds to fully open the
valves from the fully closed position. Starting the engine and rotating the valves, will vividly
demonstrate the vast differences now available to you. Double check your work, look and listen for leaks
and make sure nothing is touching the hot or moving parts, road test and enjoy!!
|
| This under-car view shows the Exhaust Cut-Outs installed, wiring is next. |

|
| Notice how wiring harness was routed behind heat shield for protection. |
|
| Here, Cut-Out is installed on main exhaust side, ready for side pipes. |
|
|
Follow Up: It's been several months since we installed the Electric Cut-Outs, and
I'm pleased to let you know that we have had zero problems and the system just gets cooler and cooler. I
love the fact that I can control the amount of rumble with just a flick of a switch. Sometimes you just
don't won't to have that noise, you simply won't to take a drive and listen to the radio and enjoy the drive.
The Cut-Outs allow this to happen seamlessly. Other times I do want to announce our presents way
before we arrive, so I open up the Cut-Outs and let her roar. You diffidently can hear and see a difference,
people will be looking around, trying to see what all the commotion is about, then you round the corner and they go,"
OOO,,a Boss". The sound draws them in and the car keeps their attention until you round the next corner
or drive out of site. But, just remember…all this attention doesn't escape the cops scrutiny
ether. So, have some sense about you and your actions, and everything will be just fine, others wise I can see this car and
it's lovely noise getting many a owner in trouble.
The other issues are comical most time. It seems this car and especially this car with the open
exhaust system seems to draw in all the want-a-bee's and nuts out there. Everyone wants a piece of
you, and I have been challenged from everything from a 1979 Chevette to the newest Corvette. Diesel trucks,
Camay's, Cavaliers and everything in between seem to want to challenge you at every stop light. Most
are simply innocent encounters by guys and girls that love the car and simply want to acknowledge that, while having some
fun. Others I'm not sure of? There is diffidently a crowd of people out there, that
are dam right angry about something. I'm not sure if it is me, the car, or both. Maybe
there simply mad at themselves and their situation, and taking it out on the car? I don't know, but they are in need of
counseling. I have never felt jealousy told someone or what they had. I love seeing
nice cars and trucks and knowing that there are other out there that like to work on and modify their cars as I do.
I could never disrespect a car owner simply because they had a nice car, much less try to do it harm, but there are
those that think differently. I have had some very bad experiences with car shows in the past, so much
so that we haven't entered one in over twenty
years, despite that fact that we have several very modified and show worthy vehicles, I know most or 90%
are wonderful people, but that screwy 10% can leave a very bad taste in your mouth when they strike.
|


