Pro Weld Performance Parts

Supercharger System

Home
Bargin Pitt
What's New!
Socket Head Bolts, Nuts, Washers & Spacers
The Cobra Connection
Engine Blocks
Custom Wiring Harnesses & Electrical Supplies
Fuel Injection
Specialty Tools and Taps
Fittings
Insulation
Our Policies
Our Location
About Us
Complete 4.6L & 5.4L Engines
03-04 Cobra Assembly Manual
Inter-Cooler Coolant System
Cobra Specific Parts Page
ProWeld Projects Page
4.6L, 5.4L & 5.0L Parts and Accessories
Engine Building Service
Super Coolers
ProWeld 2, 3 & 4 Valve Heads
Ford 4.6L Dry Sump Kit
Coatings
Engine Bolt Kit Page
ARP Engine & Automotive Fasteners
     

     The Supercharger System

                         CobraBlowerView.jpg      


   CobraBlowerDrawing.gif


Item Part Number Description
1 12B637 Wiring harness
2 9C986 Fuel pulse damper
3 9F792 Fuel injection supply manifold
4 9F593 Fuel injector
5 Stud
6 9D475 Exhaust gas recirculation valve
7 W701232 Bolt
8 N806979 Stud
9 EGR vacuum hoses
10 6F089 Vacuum actuator valve
11 N605892 Bolts (2 req'd)
12 Bolts (10 req'd)
13 9J447 Lower intake manifold
14 9L438 Coolant intake manifold gasket
15 Coolant tubes
16 9N491 Coolant intake manifold
17 W701592 Bolt
18 NL443 Inter cooler hose
19 NL443 Inter cooler hose
20 W506404 Bolts (10 req'd)
21 6K755 Charge air cooler
22 6F066 Supercharger assembly
23 N605892 Bolt
24 9726 Accelerator cable bracket


Intake Air Distribution and Filtering — Supercharger, Charge Air Cooler  
     

     The supercharger (SC) is a positive displacement pump. Its purpose is to supply an excess volume of intake air to the engine by increasing air pressure and density in the intake manifold. The supercharger is matched to the engine by its displacement and belt ratio, and can provide excess airflow at any engine speed.


NOTE:
The supercharger is repaired only as an assembly. Disassembly of the supercharger unit may void the warranty.


NOTE:
The supercharger is not a bolt-on option. It is part of an integrated engine system. Many components of the supercharged engine are not interchangeable with similar parts from a non-supercharged engine.


     The supercharger contains two three-lobed rotors. The helical shape and specialized porting provide a smooth discharge flow and low level of noise during operation. The rotors are supported by ball bearings in front and needle bearings at the rear. The drive gears are pressed into place, therefore the supercharger is installed new as a unit, and is not repairable.

The supercharger system is a blow-through type with the fuel injected directly into the intake ports. The supercharger is belt driven off the crankshaft through an idler pulley. The throttle body controls the amount of intake air to the supercharger through the intake plenum. Air from the supercharger is routed through the charge air cooler (CAC), then to the intake manifold. The resulting denser air charge in the combustion chamber provides for a higher power output of the engine over a non-supercharged engine of the same displacement.


NOTE:
It is not possible to increase manifold pressure or engine power output by altering the bypass valve or the actuator.


     At partial-throttle opening or when vacuum is present in the intake system, a vacuum-controlled bypass valve reroutes some discharged air from the supercharger back through the intake plenum. This prevents the supercharger from cavitating, causing reduced performance, increased temperatures, and poor fuel economy.
 

    The supercharger has a self-contained oiling system that does not require a fluid change for the life of the vehicle. However, at every 30,000 mile interval, the supercharger fluid level should be checked. The vehicle should be parked on a level surface, the engine cool, and not running. To check the oil, remove the Allen head plug located at the front of the supercharger. The oil level should be at the bottom of the fill plug threads when cold. If the fluid level is low, add Synthetic Supercharger Fluid E9SZ-19577-A or equivalent meeting Ford specification ESE-M99C115–A

Supercharged vehicles are equipped with a charge air cooler (CAC). The CAC cools the pressurized air from the supercharger, increasing the air density, which improves combustion efficiency, engine horsepower and torque.


Torque Specifications
Description Nm lb-ft lb-in
Air cleaner and duct assembly bolt 7 62
Coolant supply and return manifold a
Charge air cooler bolts a
Supercharger mounting bolts a
Air intake scoop bolts 25 18
Air intake scoop bracket bolt 25 18
Air intake scoop bracket nuts 25 18
Air intake scoop bracket throttle body nut 9 80
Exhaust gas recirculation (EGR) vacuum regulator solenoid bolts 10 89


The Supercharger System


The Supercharger Assembly
        Cnv0315.jpg
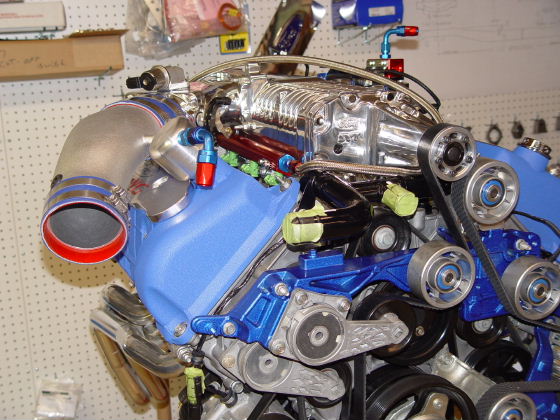
           Above:  Who doesn't have a soft spot for a V-8 with a Supercharger!!!


     The most obvious part on the whole Engine, is,.... yes you guessed it,.... the Supercharger. Just the look of it sends chills down the performance minded guy’s spine,,,This is the main difference between the 03-04 Cobra and the rest of the Cobra family. Of-coarse, by now you have learned that there are many differences that make the 03-04 Cobra special, it’s just this one piece tells the world who it is and what it can do!

The Supercharger is relatively a easy piece to get, there are many on E-Bay to purchase, every time I visit the site. The main problem, is trying to purchase a good, useable, and complete piece....that’s the difficult part. These Superchargers are still available from Ford, and while they are very expensive, listing in the $12-1300.00 range, they are useable from the get go. The units on E-bay, at least the majority, have to be rebuilt before they can be re-used. Yes, the adds might say different, but any Supercharger with that many miles will need rebuilding.....Period....so make sure you budget for it. Yes you could bolt the used piece onto your new Engine and it will work, meaning it will turn and might even produce some boost, But it will not produce the right amount of boost or power a new unit, or re-built unit will. You will be less then impressed with your new Engine, to say the least. The rebuild process is not that complicated, at least not if the core is still useable. A good company like Stegmieers, will rebuilt the front drive and re-coat the rotor tips to bring the Supercharger back to like new performance. They can also Port the Blower for even better performance, as well as Polish the blower for out standing looks. I have used there services and whole heartedly endorse them.

The Blower sit on top of the Lower Intake Manifold, and is held there by 10 bolts. Between the Manifold and the Blower is a special gasket, who’s purpose is to seal the two piece against leaks. This gasket is always replaced when the blower is separated....no exceptions. It is a very thin metal gasket that has a raised bead all the way around the gasket and this bead gets flattened when the two are tightened down against one another.

The bottom line is you can buy new and bolt it on, or you can buy used and send it out for a re-build, then bolt it on. The choice is yours to make, just be sure to know the options and budget accordingly.


Supercharger Assembly                            2R3V-6F066


   Accelerator Cable Bracket

     This small bracket sits on the passenger side of the Supercharger assembly, and is used to secure the end of the accelerator cable. I have never seen one of these for sale on E-bay and would advise to just purchase it from Ford, they are not expensive.


Accelerator Cable Bracket                         2R3V-9726


      Lower Intake Manifold
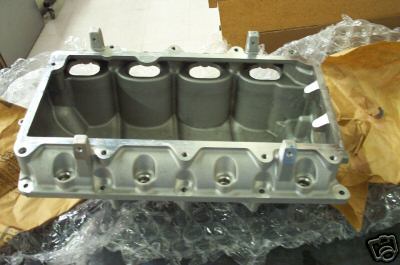
  LowerManifold.jpg   LowerManifold1.jpg
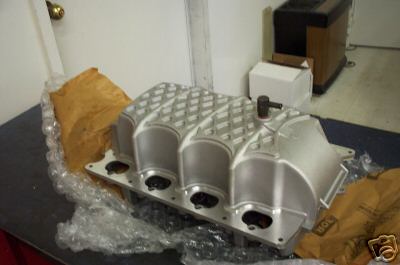
Above:  The Lower Intake Manifold is a huge piece, and is really something that doesn't normally wear.  This is a shot of a new one which will set you back about $700.00, while Ford still sells these, they are sometimes listed on E-Bay.


     The Lower Intake Manifold is the part the Blower sits on and is bolted to. This part is very large and is made form Cast Aluminum. While very protected, you have to make sure the sealing surfaces are OK, and that the bottom of the Intake Manifold is not damaged. While it is rare, I have seen several Engines where a Rod has let go, taking the block and Intake Manifold with it. This is just something to check. These are also on the rare parts watch list, and when found always bring top dollar. It’s a good ideal to buy one anytime you find one at a reasonable price, regardless of weather you plan to build your own "Terminator" Engine or not, they are money in the bank. The Intake Manifold requires 2-gaskets that seal the passage from the Heads to the Intake Manifold, and always start with new gaskets. There are 10-Mounting Bolts that secure the supercharger to the Manifold and another 10-Mounting Bolts that secure the Intake Manifold to the Heads.

lower Intake Manifold                               2R3Z-9J447

Manifold Mounting Bolts (10 Req’d)


       Supercharger Charged Air Cooling System


     This is a Sub-System of the Supercharger system, and we will examine this system at a higher degree.  The Sub-System is made up of the following parts:

                                The Inter-Cooler or Charge Air Cooler
                          The Inter-Cooler Tube Assembly
                          The De-Gas Bottle
                          Water Pump
                          System Plumbing
                          Front Mounted Cooler


     We have already talked about the Charge Air Cooler or Inter-Cooler as it is known by most.  This assembly also includes the Coolant Intake Manifold and it's gasket.  This group of parts consist of the Manifold, 2-small tubes, each with O-Rings attached to them, and a Gasket.  This group of parts has the duty of allowing coolant to pass into and from the Inter-Cooler without allowing a leak of coolant or air.  The Coolant Intake Manifold, it's gasket and Twin-Tube assembly are very hard items to find used.  If you do find these, make sure the unit is complete, as they are also expensive and hard to get from Ford.

     De-Gas Bottle
      80233.jpg
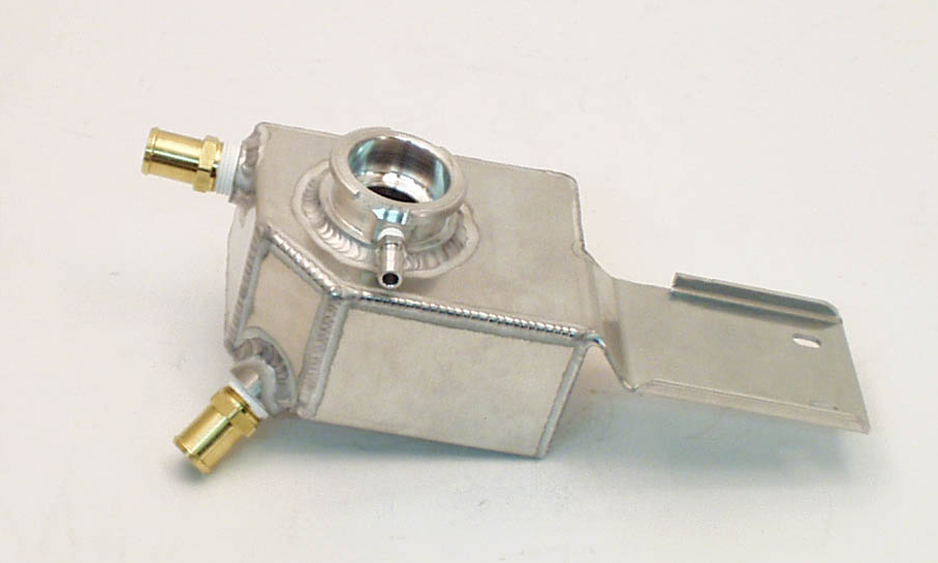
     Above:  This is the Canton De-Gas Bottle, while made completely from Aluminum it can be polished fro a incredible shine.  The Factoy piece is plastic and fairly easy to come by.

     The De-Gas Bottle has the responsibility of allowing traped system air to escape and allowing the owner to re-fill the system with clean freash coolant.  The original system uses a plastic De-Gas Bottle which can be replaced by a Canton Aluminum unit pictured.  I have seen this item on E-Bay cheap, but not many of them.  The Canton unit is readialy available and can be polish to a rich luster.  Make sure the De-Gas Bottle is locate at the highhest point in the system, and remember, you have to be abile to access it for system replinishment.

     Front Mounted Cooler


     The Ford unit mounts in the front fashia, behind the bumper cover.  There are stock replacement pieces and several high capacity units out there for sale.  I would consider a higher capacity unit way before I purchased stock unit from the factory.  For those installing this unit in a Hot Rod or Street Rod, you may ellect to not use the De-Gas Bottle or Front Mounted Cooler from Ford, and instead use a small Radiator.  I have used small Motorcycle Radiators or even small Car Radiators from Honda to serve as both Cooler and Filler piece.  The main thing is, you have to get the Cooler into the air flow, in crowded locatuion you might think about using a Electric Fan mounted to the Cooler to draw additional air flow.  If placed right, a small radiator can serve as cooler, de-gas bottle and filler.

     Electric Water Pump

     EWaterPump.jpg

     The Water Or Coolant Pump is a seperate and dedicated part that only serves the Intake Charge Cooling System.  This Pump is manufactured by Bosch and opperates on standard 12 Volts Electric.  It is controlled by a Coolant Temp Sensor that senses Inter-Cooler Coolant temps and switches on or off independently of other vehicle functions.  This is a very popular item on E-Bay and generally sell for $90-100.00.  Again there is no need to use a old Pump.

           Twin Tube Assembly
                  and other
         Cooling System Hoses
     CobraSCTubes.jpg

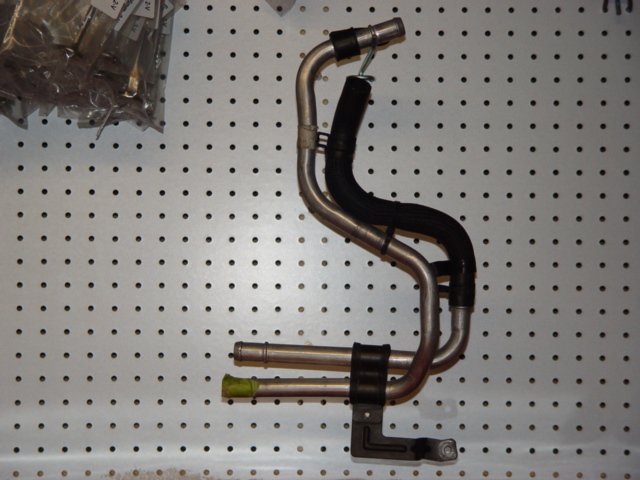
     The Twin-Tube Assembly is located in the passenger side front of the Engine.  It takes both incomming and out going coolant down the side of the engine to where it will connect with the System Hoses.  The Assembly keeps the coolant protected and well dressed.  I have many times abandoned this assembly and simply attached my Performance Hoses right at the Coolant Manifold.  This elliminates a lot of engine cluter and keeps the hose connections to a minimum.  You will have one hose that runs from the outlet side of the Manifold to the De-Gas Bottle, or Radiator (depends on your arangemnt) then one hose from the De-Gas Bottle to the Front Mounted Cooler.  Another hose from the Front Mounted Cooler to the Coolant Pump, then another hose from the Coolant Pump to the Inlet side of the Manifold.  While the Twin-Tube Assembly has it place, especially on a stock vehicle, it also adds many un-neccessary connections.


     Fuel Injectors
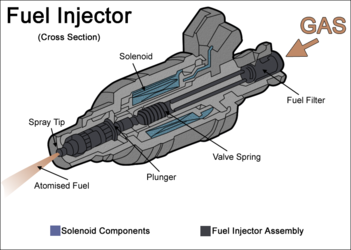

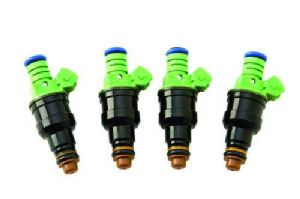
     351px-Fuelinjector.jpg             397-M-9593-F304F.jpg

Above:  This display will help list the many working parts of a modern Fuel Injector.  The (Green) Ford Fuel Injectors are the popular replacement for the standard (Blue) Fuel Injectors that come with the stock 03-04 Cobra Engine.


     The Fuel Injectors are another item that is specific to the 03-04 Cobra Engine. They are 39lb/hr rated Fuel Injectors(Blue in Color) that produce a special Dual-Pattern Spray Cone. This unique Spray Cone is designed to lower emissions and help with Fuel Economy, by directing the fuel spray pattern towards the back of the Intake Valves. This is another item that is normally tough to find on E-bay, but I have seen them from time to time. The popular route is to abandon the stock Fuel Injectors in favor of some Ford 42lb/hr Fuel Injectors. These do not have the Emissions Fuel Spray Pattern, and make considerably more power then the stock units. Since the stock Injectors are fairly rare, the performance Injectors are only slightly higher then new stock units, and make sensible new replacements. I have always replaced the 39lb/hr injectors with the newer 42lb/hr units. You will have to modify the EEC or Computer fueling tables with the new 42 lb Injectors, which isn’t a big deal.

I would never use old, high milage Injectors on a new Engine, it makes no sense. Fuel Injectors have a small O-Ring top and bottom to seal them, make sure your Injectors have this item and that it’s in good shape.

Fuel Injector                                            2R3V-9F593


   Fuel Injector Supply Manifold

                     Or

        Fuel Injector Rails
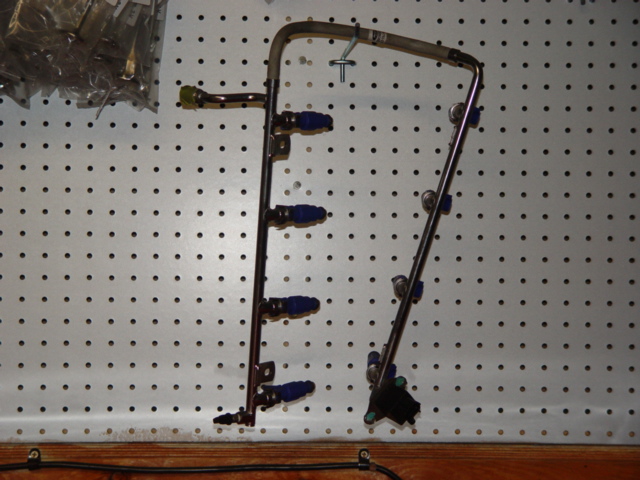
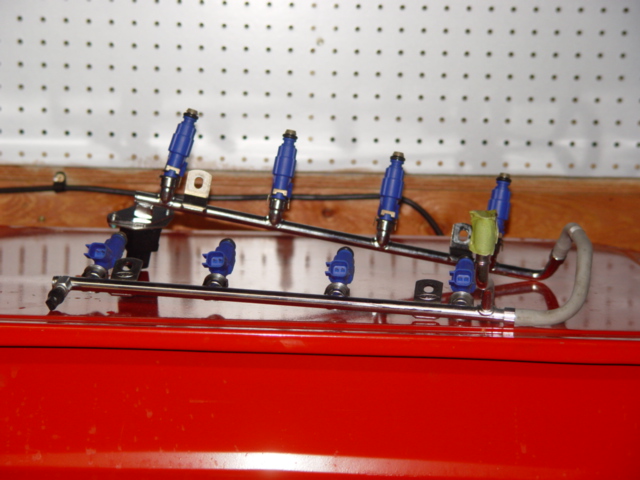
   Cobra1FIRail1.jpg  Cobra1FIRail.jpg

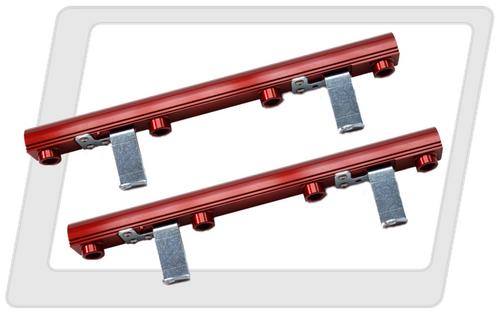
   AeroFuelRails.jpg
Above Top:  This is the Stock and very restrictive Fuel Injector Supply ManifoldAbove:  This is the good looking Aeromotive Fuel Rail


     The Fuel Injector Supply Manifold used on the stock 03-04 Cobra Engine is very restrictive. It consist of a very small steel line, one for each side, connected by a rubber hose. This is one item I would throw in the trash, and replace if I was building a 03-04 Cobra Engine and had this piece. In it’s place I would install a nice Aluminum Fuel Rail, like the ones Aeromotive or similar manufactures make. These not only look nicer, but flow tons more fuel and will really wake-up that Cobra Engine. The stock 03-04 Cobra uses what is known as a Non-Return style Fuel System. This means the Fuel drawn from the Fuel Tank is on a one way trip to the Fuel Injectors, the system uses a Pressure Transducer and Computer to very Fuel Pump output to meet Engine demands, and the Fuel will wait till the Engine needs it, resting inside the Fuel System Lines, Rails and Filter. On a Return Style System, the Fuel is drawn from the Fuel Tank and sent directly to the Fuel Rail, there the Engine uses a portion of the Fuel and what is not used is sent back to the Fuel Tank. In this system the Fuel Pump is always running at full speed, and the Fuel Pressure Regulator is responsible for determining how much Fuel gets returned to the Fuel Tank. There are pro’s and con’s to both systems, but it is generally agreed on that the Return Style Fuel System is more High Performance Oriented and makes more Power.

I have used with exceptional results, the Kenny Bell Adjust-A-Pump, Fuel Pump Booster. The system uses a transformer to raise secondary voltage to the Fuel Pump, which makes the Fuel Pump, Pump faster for more Volume and Fuel Pressure. This System works great and only increases the Fuel Pump Output when needed, like when Boost pressure is High.


Fuel Injector Supply Manifold                    2R3V-9F792

Fuel Pulse Damper                                   2R3V-9C986


     Vacuum Activator Valve


     This piece, the Vacuum Activator Valve, Is located on the drivers side of the Blower up on top. It is there to protect the Blower from back fires and sudden pressure spikes. It also allows the blower to "Free Wheel" when load is low, saving some much needed fuel for better Fuel Economy. This Valve is usually included with the Blower, but watch for broken or cracked Valves, as the unit is made of plastic and often gets damaged in transit. RPM Outlet, a great source for Cobra Parts, has a free diagram on how you can modify the Valve for better performance. You can check them out at: http://www.rpmoutlet.com/boost%20bypassc.htm

While there check out there great selection of 03-04 Cobra parts, not only are they one of the Cheapest part sources around, but they have excellent customer service!! I have used them many times with great results.

The Activator Valve mounts to the Vacuum Accessory Bracket along with the Manifold Absolute Pressure Sensor, Differential Pressure Feedback EGR System, and Exhaust Gas Recirculation Vacuum Regulator. Most eliminate the EGR System when they build one of these Engines, but you may or may not decided to keep it in tact. If you do you will need the Associated parts for the EGR System which I will list below.

Vacuum Activator Valve                                    2R3V_6F089
Bolts (2 Req’d)                                                  2R3V-N605892
Exhaust Gas Recirculation Tube                         2R3V-9D477
EGR Valve                                                        2R3V-9D475
Manifold Absolute Pressure Sensor
Differential Pressure Feedback EGR System      2R3V-9J460
EGR Vacuum Regulator                                    2R3V-9J472


          Throttle Body

                 and

          Spacer Tube

                 and

          Spacer Tube

                 and

          Spacer Tube


     The Throttle Body is located on the Passenger Side top of Engine, it is connected to the Blower by the Spacer Tube. The Throttle Body is designed to Limit the intake of air, and it does so by opening or closing it’s two large intake plates or more commonly known as "Butterflies". Attached to the Throttle Body are the TPS or Throttle Position Switch and IACV or Idle Air Control Valve. The TPS allows the EEC or Computer to know the position of the throttle body butterflies, and the IACV is adjusted by the EEC or Computer to maintain a steady and smooth Idle.

The Throttle Body and it’s Spacer are very popular items on E-Bay, and for good reason, most replace the factory units with better performing pieces from makers like BBK and Accufab. There produces have larger openings for more volume and come polished or chromed, for supper good looks. If I was pressed to purchase a new unit, it would be one from the aftermarket, and not a stock ford part.

Idle Air Control Valve                               2R3V-9F715

Idle Air Control valve Gasket

IACV Mounting Screws
Spacer Assembly                                     2R3V-9P697
Throttle Body Gasket                               2R3V-9E936
Throttle Body                                           2R3V-9E926

Bolts (4 Req’d)

Bolts (2 Req’d)
Throttle Position Switch                            2R3V-9E929
Nuts (4 Req’d)                                          2R3V-N804178

Studs (4 Req’d)

Spacer Assembly Gasket


     CobraThrottleBodyDrawing.gif


Item Part Number Description
1 6F066 Supercharger assembly
2 N806154 Screws (2 req'd)
3 9F715 Idle air control valve
4 Idle air control valve gasket
5 9P697 Spacer assembly
6 9E936 Throttle body gasket
7 9E926 Throttle body
8 Bolts (4 req'd)
9 Bolts (2 req'd)
10 9E926 Throttle position sensor
11 N804178 Nuts (4 req'd)
12 Studs (4 req'd)
13 Spacer assembly gasket
14 9D475 Exhaust gas recirculation valve
15 Stud
16 9D477 Exhaust gas recirculation tube
17 Manifold absolute pressure sensor
18 9J460 Differential pressure feedback EGR system
19 9J459 Exhaust gas recirculation vacuum regulator
20 9J472 Vacuum accessory bracket


                            Gaskets, Seals,
              & Bearings

     The Ford Service Manual I have doesn't list Gaskets needed for the assembly of the 03-04 Cobra Engine.  Obviously you have to have Gaskets or nothing will work, so I listed this Special section to show you the Gaskets I found that works and what they look like.  I Generally use Fel-Pro Gaskets when ever possible.  They are Quality Gaskets made from Premium matterials and I have always had great results with them.  Ford Seals would also work, only I do not have a listing for there Part Numbers. 
     The Diagrams I list generally do show the Seals and Bearings.  And it matters not who you choose to purchase them from.  There are many choices for Main and Rod Bearings, but I find myself always using the Ford Bearings, they work very well and are half the price of most aftermarket BearingsSeals for the most part are limited to Rear Main and Front Hub Seals, here I generally lean toward the Fel-Pro brand, and just order them with all the other Fel-Pro products I need when we build an Engine.  I like the fact that I can get Fel-Pro products almost anywhere, from the local Auto Zone or off the Web, they are easy to purchase and a quality part.


Blower to Lower Intake Manifold Gasket

     Cobra1IMGasket.jpg

     This is a very thin and fragile Gasket, and best if left in the box till needed.  This Gasket fits under the Blower and sits on top of the Lower Intake Manifold, to create a seal between the two, when tightened down.
     This is a must replace item, as it is useless after it has been tightened to spec torque.


          Intake Plentum Gasket          Fel-Pro          MS96110


     Lower Intake Manifold
                     to
     Cylinder Head Gaskets.


   CobraIGasket.jpg

     When you purchase these Gaskets they come in a set of two, one for each Cylinder Head.  The purpose is to seal the Intake Manifold aganst the Cylinder Head Inlet, so there isn't any leaks under full Vacuum or Boost.  While these Gaskets can be re-used if in good shape, I never chance it and always purchase new Intake Manifold Gaskets.


          Intake Manifold Gastet Set          Fel-Pro          MS96114

     
Oil Cooler/Filter
         Assembly
           Gasket

    Cobra1OCGasket.jpg

     This Gasket Seals the Oil Cooler/Fillter Assembly to the side of the Engine Block.  The Oil Cooler Assembly is located on the drivers side lower front of the Engine and not only has to Seal the Engine Oil System from leak and or Contamination, but has the Duty of also Sealing the Engine Coolant System form the same threats.  This is a very important Gasket, and should only be purchased new and used once.


          Oil Cooler/Filter Assembly Gasket          Fel-Pro          70415

     Oil Pan Gasket


    CobraOPGasket.jpg

     The Oil Pan Gasket is located on the very bottom of the Engine, between the Engine Block and the Engine Oil Pan.  It's job is to Seal the Oil Pan from leaking Engine Oil out or allowing anything to enter the Oil Pan and Contaminate the Engine Oil Supply.  These Gaskets can be re-used, and that would be alright if say you simply wanted to remove the Oil Pan for a quick inspection, but you should always start any New Engine with a complete set of New Gaskets and Seals.


          Oil Pan Gasket          Fel-Pro          OS30725R

     Rear Main Oil Seal

    Cobra1RMSeal.jpg

     This guy has the reponsibility of Sealing the Rear most part of the Crankshaft from leaking oil, or allowing other contaminents in.  This is no easy feat, since the Crankshaft is constantly turning and oil is splashing everywhere inside the Engine.


          Rear Oil Seal          Fel-Pro          BS40644

     Front Cover Oil Seal

    Cobra1Seal.jpg

     This is the Seal that protects the Front Cover and the Front section of the Crankshaft from Leaks.  Again it is very important that this Seal does it's job, if not there would be no way to contain the Engine oil there would leak out, and the Engine would eventualy hurt itself.  These Seals are tapped in to place, in the Front Cover.  Take your time and find yourself a seal driver or socket that is the same size and tap the Seal gently into position.


          Oil Seal          Fel-Pro          BS40620

     Valve Cover Gasket Set

   
    Cobra1VCGSet.jpg

     This is one Gasket Set you will have to purchase if you go with used Valve Covers.  The new Valve Covers come with new Gaskets.  This Set includes both Valve Cover Seals, Spark Plug Seals and Fastener Seals.  These Engines, because of there Hemi like heads, require a Seal that blocks the passage between the Spark Plug Hole and the inside of the Valve Covers.  The fastening harware is also sealed against leaks.  While all Gaskets are important, it is extremely important that the Coil Covers and there Seals be in good condition.  The Coil Covers are located on the outside of the Valve Covers and seal the top of the Spark Plug Hole and Ingition Coils.  You do not want Water, Oil or anyother contaminent going in or down the Spark Plug Tube.

         Valve Cover Gasket Set          Fel-Pro          VS50477R
    

                 Timming Cover
                          or
              Front Engine Cover
                      Gasket

     CobraTCGasket.jpg

     This is Fel-Pro's Timming Cover Gasket Set.  It comes with all three pieces of the Front Engine Cover's Seals, the Front Seal where the Cranckshaft exits the Timming Cover, and an O-Ring.  Remember that if you purchase the Front Engine Cover New, all this comes with the new part.  But you should always replace the used Gaskets and Seals when re-using used parts.  The Front Engine Cover or Timming Cover is one of the hardest pieces to access when the engine is installed in the car, you don't want to risk a oil leak because of a simple Timming Cover Seal.

     Timming Cover Gastet Set          Fel-Pro          TCS-45980-01

             Throttle Body
                     and 
        Extension Tube Seals

  
There are several Gaskets that Seal the Throttle Body & Extension Tube and the parts attached to them.  First is the Gasket that Seals the Extension Tube to the side of the Blower.  This is held in place by the 4-studs that connect the Extension Tube.  The next Gasket would be the one between the Extention Tube and Throttle Body itself.  Then we have a Gasket that Seals the Idle Air Contoler Valve, and another that Seals the Throttle Position Switch, or TPS. The Intake Plentum gasket is available from Fel-Pro, but the others are Ford parts.


            Valve Steem Seals

     While this is really a Interneal Engine Part, I will list here anyway.  The Fel-Pro Valve Steem Seals are a great way to rejuvinate your Heads at re-build.  They fit like a stock Ford Valve Seam Seal, and work wonderfully at containing the flow of Oil, in and around the Valve.  These are very economical and come in a complete set of 32.

          Valve Steem Seals (32)          Fel-Pro          SS72888


     Ford Engine Bearing Kit

     There has to be atleast 5-6 major players in the Engine Bearing catagory.  I am sure anyone of those manufacturers can supply you with a quality set of Main and Rod Bearings.  I list the Ford Engine Bearing Kits, because it is simple and priced fairly.  With one part number I can order the Factory Spec Main or Rod Bearing for an Engine, and know I have a good product for a reasonable amount of money.  Yes many Engine builder swear by there special Engine Bearings, but lets face it, Who has built more Engines, the Local Race Shop or Ford?  Yes, Ford bulids somewhere between 500,000 and 650,00 4.6L Engines every year.  They can not aford to have a Main or Rod Bearing problem, so I choose the same Bearing they use.  The Woodroof Key is for the Crankshaft Pulley.

          Main Bearing Kit          Frod         2L3Z-6D309-NA
    
 
        Rod Bearing Kit            Ford         5C3Z-6211-AB

         Woodroof Key               Ford         F1AZ-6B288-AB

Enter supporting content here

Pro Weld

5937 Ethan Drive

Burlington, KY 41005

859-586-4069

Proweld@myway.com